
What's inside
As an Amazon Associate I earn from qualifying purchases. This post may contain affiliate links at no extra cost to you.
LaserPecker Review: Which Portable Engraver Is Best?
For most people choosing a LaserPecker in 2026, the LP2 is the simpler pick for small, portable projects; the LP4 is the more versatile choice for switching between common engraving materials; and the LP5 suits buyers who need more speed or production capacity and can accommodate a larger, more involved setup. Check the usable work area—not just the advertised maximum—and confirm the exact machine configuration before buying, since accessories affect both capability and portability.
How the models differ in practice
LaserPecker’s lineup spans compact diode machines and more capable dual-source or higher-power models. Names can be confusing: “LaserPecker 2.0” and “LP2” are commonly used to refer to the LaserPecker 2, while “LP5” refers to the LaserPecker 5. Listings may bundle different stands, enclosures, rotary attachments, or other accessories, so a model name alone does not establish the complete working setup.
As an Amazon Associate we earn from qualifying purchases at no extra cost to you.


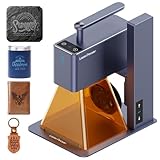

The comparison below gives useful planning figures, not a guarantee that every bundle or revision has identical specifications. Verify current manufacturer specifications and included accessories before purchase, particularly the work area, laser source, and safety equipment.
| Model | Useful work-area planning figure | Setup and portability | Best-fit materials and work | Main trade-off |
|---|---|---|---|---|
| LaserPecker 2 (LP2) | About 100 × 100 mm without expansion; larger projects require compatible expansion equipment or multiple passes | Compact head and stand; quick to move, but alignment and focus still take time | Small designs on wood, leather, coated or painted surfaces, and some plastics; material suitability varies | Small native area and diode-laser limits on bare metals and some dark or transparent materials |
| LaserPecker 4 (LP4) | About 160 × 120 mm in a standard working setup; rotary and extension configurations change the usable dimensions | More equipment than the LP2; convenient to transport when packed, less grab-and-go when fully assembled | Broader material mix, including many wood and leather projects and compatible metal marking or engraving jobs | Higher cost and more configuration choices; material results depend on the selected laser and settings |
| LaserPecker 5 (LP5) | About 160 × 120 mm for the standard flat work area; check the current bundle and accessories | More of a portable workstation than a pocketable engraver; allow room for setup, exhaust, and safe operation | Frequent or faster work across a broader range of materials, depending on laser source and workpiece | Greater space, safety, and budget commitment; not automatically the best value for occasional small items |
Choose by the job, not the model number
- Small gifts, labels, and occasional craft work: Choose the LP2 if most pieces fit within roughly 100 × 100 mm and portability matters more than material range. The LaserPecker 2.0 or LP2 is a sensible entry point when you are comfortable working within its limits.
- Mixed-material projects: Consider the LP4 if you regularly switch between wood, leather, and compatible metal or other materials. Its appeal is flexibility, not an unlimited ability to engrave every surface. Confirm which source handles the material you want and whether the needed configuration is included.
- Regular batches or a small workshop: Look at the LP5 when throughput and expanded capability can justify its cost and footprint. For a few small pieces each month, those advantages may not repay the extra setup and safety planning.
- Large signs or long boards: Don’t assume a portable engraver can cover a large design in one pass. Check the supported expansion or positioning method, then account for alignment errors, seams, and the time needed to tile the artwork.
What “portable” means once you start working
A compact laser head is only part of the kit. In practical use, portability also means carrying its stand, power supply, cables, work surface, any enclosure, and possibly an exhaust solution. A rotary attachment adds another component and changes how much bench space you need. The LP2 is the easiest of these three to move for short jobs; the LP4 is portable as a packed kit; and the LP5 is better treated as a workstation you can relocate than as a device to set up anywhere.
Setup time depends on whether the machine is already aligned, the material is flat, and the design is ready. Allow several minutes to position and focus a familiar setup; first-time work, a rotary job, or a change in material can take longer. A smaller machine is not automatically faster overall: repeated alignment for multiple items can outweigh the time saved by a quick initial setup.
For batches, make a simple layout before engraving. If a design is 40 × 40 mm and you leave 5 mm between pieces, each item occupies about 45 × 45 mm of bed space. A 100 × 100 mm area fits four such positions in a 2-by-2 layout (90 × 90 mm total), before allowing for margins or clamps. That calculation is more useful than assuming the maximum work area will be fully usable.
Materials, safety, and app reliability
Material range is where model choice matters most. Diode lasers are useful for many wood, leather, paper, and coated-surface jobs, but they are not a universal substitute for a dedicated metal-marking process. Dual-source machines can broaden the range of suitable tasks, yet settings, surface finish, color, thickness, and the exact laser source all affect results. Test a small offcut before committing a finished piece. Avoid unknown plastics and materials that may release hazardous fumes; check the material’s composition and manufacturer guidance.
Use the correct protective equipment for the laser wavelength and power, and favor a compatible enclosure with appropriate guarding. Enclosures reduce exposure and contain some debris, but they do not remove the need for ventilation or safe supervision. Keep the work area clear, never leave an operating laser unattended, and follow the machine’s safety instructions and local rules. Do not rely on ordinary glasses or a phone camera as laser protection.
The app is part of the workflow, not a minor accessory. Before a large project, check that your phone or computer is supported, install the current app, and run a small test design. Keep a copy of artwork outside the app, and confirm dimensions, orientation, focus, and framing before starting. Bluetooth or connection interruptions, permission settings, and software updates can disrupt a job; a saved test file and a short preflight routine reduce wasted material. If you depend on repeatable production, assess the supported computer workflow and file handling as carefully as the laser specifications.
Ownership costs and common frustrations
Budget for more than the engraver. Depending on the model and package, an enclosure, exhaust equipment, rotary attachment, extension hardware, work surface, and material samples can add meaningfully to the total. Portable engravers generally do not require a cutting-tool-style supply of blades, but lenses and protective windows need to stay clean and may eventually need replacement. Dust and smoke residue can reduce optical performance, so follow the maker’s cleaning instructions and avoid touching optical surfaces with bare fingers.
Common avoidable problems include engraving warped stock, skipping a focus check after changing material thickness, using an unsuitable material, and assuming an accessory is included because it appears in a demonstration. For repeat work, keep notes on material type, thickness, focus position, and settings; small differences between batches can change the result. Prices vary with bundles and promotions, so compare general market ranges for the complete setup you need rather than the headline price of the bare machine.
Bottom line
Choose the LaserPecker 2 (LP2) for the smallest, simplest portable setup and modest projects. Choose the LP4 when material flexibility is more valuable than minimum cost and you have checked which source and accessories your jobs require. Choose the LP5 when frequent use, speed, or broader capability earns its larger investment and working footprint. In every case, size your purchase around the pieces you actually make, the materials you can safely process, and the complete setup you are willing to carry and maintain.