What's inside
As an Amazon Associate I earn from qualifying purchases. This post may contain affiliate links at no extra cost to you.
The Basic Choice
A replaceable bench top insert is a section of the workbench that you remove and replace when it becomes damaged. It may be a hardwood panel, MDF insert, plywood section, or a grid of smaller replaceable panels. A sacrificial workbench cover is a thin layer laid over the existing bench, usually hardboard, MDF, plywood, or tempered hardboard.
Both protect the main bench from saw cuts, glue, paint, and drilled holes. They solve the problem differently. An insert becomes part of the bench and can be fitted accurately around dogs, vises, tracks, and other hardware. A cover is faster and cheaper to install, but it can move, swell, curl, or interfere with clamping unless you secure it properly.
As an Amazon Associate we earn from qualifying purchases at no extra cost to you.


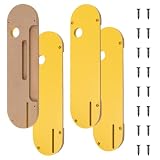
For a general-purpose bench that sees assembly, hand-tool work, and occasional cutting, a replaceable cover is usually the sensible starting point. Inserts earn their cost when the bench includes permanent fixtures or needs to stay flat and precise after years of hard use.
How Replaceable Bench Top Inserts Work
An insert is set into a routed recess or framed opening in the benchtop. The support underneath must be flat and strong; a thin panel spanning an open area will flex and eventually break around dog holes or clamps. A common arrangement is a 3/4-inch plywood or MDF subtop with a 1/4- to 1/2-inch replaceable surface panel.
Good inserts are attached with screws from below, threaded inserts, or bolts that can be removed without damaging the panel. Avoid gluing the sacrificial surface in place. The whole point is to replace it. Countersink fasteners carefully so clamps and workpieces do not catch on them.
For a bench with bench dogs, the insert needs accurately aligned holes. A 20 mm or 3/4-inch dog-hole pattern is common, but mixing the two sizes creates expensive problems. Even a 1/32-inch error can make dogs bind or prevent a holdfast from seating. Make a drilling template and test it on scrap before drilling the actual panel.
Inserts are also useful around a router table, downdraft area, or miter saw opening. When a cutout gets chewed up, you replace only that zone rather than removing everything from the bench. Search for bench dog hole drill guides if you are building a patterned insert rather than drilling freehand.
How Sacrificial Covers Work
A cover is normally a full sheet cut to the bench footprint. Tempered hardboard around 1/8 inch thick is smooth, inexpensive, and easy to replace. MDF from 1/4 to 1/2 inch is flatter and more rigid, but its edges are vulnerable to moisture and impact. 1/4-inch plywood is tougher and holds screws better, though its surface may be less smooth and more likely to telegraph small imperfections.
A loose cover is acceptable only for light assembly. It can slide when you plane, shift under a clamp, or lift at the corners. Secure it with screws placed outside the main working area, countersunk below the surface. Alternatively, use a few recessed threaded inserts in the bench and bolt the cover down. Do not rely on double-sided tape for a cover that will see hand-planing or pounding.
Leave a small clearance, roughly 1/16 inch per side on a large panel, so seasonal movement does not force the cover against the bench frame. Hardboard moves less than solid wood, but it can still bow if one face gets wet or is painted unevenly. Seal exposed MDF edges with paint, shellac, or polyurethane if the shop is damp.
Keep a spare sheet on hand. A cover is most useful when replacement takes ten minutes rather than becoming a project that gets postponed for six months.
Insert Versus Cover
| Feature | Replaceable insert | Sacrificial cover |
|---|---|---|
| Typical cost | Higher; requires accurate cutting and support | Low; often one sheet of hardboard or MDF |
| Installation | Routed recess, frame, or dedicated opening | Cut to size and fasten or clamp down |
| Flatness | Can be very good if well supported | Depends on the original bench and panel thickness |
| Bench dogs and vises | Can be permanently integrated | Holes must be duplicated or the cover must be removed |
| Replacement | Usually replaces one damaged section | May require replacing the entire sheet |
| Best use | Precision work, fixtures, and high-wear zones | General assembly, glue-ups, painting, and dirty work |
Common Failure Modes
The most common insert failure is inadequate support. A panel that sounds solid but spans a gap will sag under a clamp. Add crossmembers or a continuous subtop before installing the insert. Another problem is hardware trapped by the insert. Leave access to vise bolts, dust-collection fittings, and electrical cables; otherwise a simple replacement can require dismantling half the bench.
Cover failure usually starts with movement. If the panel slides, a workpiece can shift while you cut or chisel. If it curls, the raised edge can catch a long board or stop a hand plane. Screws solve movement, but they create holes and must be kept away from areas where you expect to cut. Recessed threaded fasteners are cleaner if you change covers frequently.
Glue is another issue. A cover coated with dried glue becomes a problem when the glue bonds to the workpiece. Scrape spills while they are rubbery, or use a cheap removable hardboard surface for glue-heavy work. Do not use a heavily textured rubber mat as a permanent work surface: it can hold grit against finished parts and makes accurate marking difficult.
What to Buy and When
For the lowest-cost solution, buy a sheet of tempered hardboard, cut it slightly smaller than the bench, and countersink four to eight screws around the perimeter. This is fine for glue-ups, finishing, light assembly, and a bench that already has a sound, flat top.
Choose a thicker MDF workbench panel when you need a more rigid surface but do not need dog holes. Protect the edges from moisture and expect the panel to be heavy. For a bench used for hand planing, use a stable plywood or hardwood insert supported continuously underneath rather than thin hardboard.
Build inserts when your bench has a vise, dog-hole grid, router opening, or dedicated cutting area. A practical design uses a permanent structural top with replaceable 1/2-inch panels in the areas most likely to be damaged. Keep at least 2 inches of material around dog holes and fasteners where possible. If the surface is repeatedly cut more than about 1/8 inch deep, replace it instead of trying to flatten it indefinitely.
Installation and Shop-Safety Checks
Before cutting either option, check that the bench is level and does not rock. A replaceable surface cannot correct a twisted frame. Mark screw locations clearly, and use a depth stop when drilling so you do not damage wiring, dust-collection tubing, or the bench frame below.
After installation, run a straightedge across the surface in several directions. A gap greater than roughly 1/16 inch over a 4-foot span is noticeable during assembly and can affect hand-tool work. Confirm that no screw head, dog, vise jaw, or cover edge can catch clothing or a workpiece. If you use power tools on the bench, treat the surface as a sacrificial cutting area and keep electrical cords and dust-collection hoses routed away from the blade path.
The cheap cover is fine for most shops because it is easy to replace and discourages you from treating the bench like furniture. Choose inserts when accuracy, built-in hardware, or localized replacement matters more than speed and low initial cost.