
What's inside
- Quick comparison: wired versus wireless backup cameras
- Best backup camera types by vehicle
- Wired versus wireless: which installation is actually better?
- Features that matter more than maximum resolution
- Decision matrix for common buying situations
- Installation details that prevent common failures
- Ownership, cleaning, and expected wear
As an Amazon Associate I earn from qualifying purchases. This post may contain affiliate links at no extra cost to you.
The best backup cameras for most drivers are a weatherproof 1080p wired system for maximum reliability, a Garmin BC 50-style wireless camera for simpler installation, or a Furrion Vision S system when you need a large monitor for a trailer, camper, or work vehicle.
The right choice depends less on the camera’s headline resolution than on four practical questions: how difficult the cable run will be, how wide an area you must see, whether you reverse at night, and how much water, dust, vibration, and road salt the system will face. A camera for a compact car does not need the same coverage or monitor as one fitted to a pickup carrying lumber or towing a trailer.
As an Amazon Associate we earn from qualifying purchases at no extra cost to you.


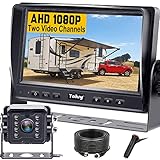
Quick comparison: wired versus wireless backup cameras
| System type | Typical image | Installation time | Typical viewing angle | Typical market range | Best suited to |
|---|---|---|---|---|---|
| Basic wired camera and dash monitor | 480p–720p | 3–6 hours | 120–150 degrees | $70–$180 | Cars and permanent installations |
| 1080p wired system | 1080p | 4–8 hours | 130–170 degrees | $150–$350 | Pickups, vans, and frequent use |
| Digital wireless camera | 720p–1080p | 1–3 hours | 120–160 degrees | $150–$400 | DIY installation and leased vehicles |
| Trailer or RV camera system | 720p–1080p | 2–5 hours | 120–150 degrees | $250–$700 | Campers, trailers, and long vehicles |
These are useful planning ranges rather than guarantees. A camera’s actual image quality also depends on lens distortion, screen brightness, wiring, radio interference, and how well the lens is protected from dirt.
Best backup camera types by vehicle
Best for a compact car: a small wired camera with a 4.3- to 5-inch monitor
A compact car usually benefits from a modest camera rather than an oversized RV display. A 120- to 150-degree lens provides enough width to show the rear bumper and nearby corners without making objects look excessively small. A wired connection is usually preferable if the camera will remain installed permanently: the cable is hidden once, and there is no wireless link to troubleshoot.
Look for a camera that can be mounted beside the license plate or in the hatch trim, with a compact monitor that does not obstruct the windshield. A 5-inch screen is generally easier to read than a phone-sized display while still fitting neatly on a dashboard. A 170-degree lens can sound attractive, but extreme wide-angle lenses often bend straight lines and make distance judgment harder.
Best for a pickup or work truck: a 1080p wired camera with a wide, adjustable lens
Pickups used for woodworking materials, sheet goods, or long tools need more useful coverage than a small car. A camera mounted high on the tailgate or near the third brake light can show the bed edge and the area behind the truck. Choose an adjustable camera angle so the lower part of the image includes the bumper or hitch, not only the horizon.
A 130- to 150-degree horizontal view is a sensible compromise. It is wide enough for reversing into a driveway or loading bay while preserving better distance perception than an ultra-wide lens. A 7-inch monitor is worthwhile if the truck has a tall bed, a canopy, or frequent blind-side maneuvering. If the truck regularly tows, select a system with a switchable camera input or a second camera aimed at the hitch.
Best for a van: a high-mounted camera and 7- to 9-inch display
Panel vans have large areas immediately behind them that cannot be seen through the rear doors. Mounting the camera high reduces the chance that cargo will block it, while a larger monitor makes it easier to distinguish people, posts, and low obstacles.
For a van used on building sites, prioritize a rugged metal or reinforced-polymer housing, a sealed connector, and a camera rated at least IP67. A 9-inch monitor can be helpful in a large vehicle, but it needs a secure mounting position; a loose display becomes a distraction and can detach during sudden braking.
Best for a trailer or camper: a dedicated wireless system such as Furrion Vision S
Running a video cable through a detachable trailer is inconvenient, and a conventional wireless camera intended for a short passenger car may not maintain a stable connection over a long trailer. Trailer-specific systems, including the Furrion Vision S range, are designed around this use case and commonly offer dedicated displays, marker-light or rear mounting options, and multiple camera inputs depending on the model.
For a trailer, measure the distance from the camera to the tow vehicle’s dashboard before buying. The advertised wireless range is often measured in open conditions; metal trailer bodies, other transmitters, and the tow vehicle can reduce practical range. A system with a 7- to 9-inch monitor is easier to use when the trailer is wide or the camera is mounted high.
Wired versus wireless: which installation is actually better?
Choose wired when reliability matters most. A wired camera receives continuous power and sends video through a dedicated cable, so it avoids pairing problems, radio congestion, and many image dropouts. The disadvantages are the installation time and the need to route cable through trim, a tailgate, or a trailer connection. Wiring also requires careful protection from hinges, sharp edges, exhaust heat, and standing water.
Choose digital wireless when installation is the limiting factor. A modern digital wireless system is much more practical than an old analog transmitter, particularly for a pickup, hatchback, or leased vehicle. It can reduce installation to powering the camera and mounting the display. However, the camera still needs a reliable power source, and wireless systems can show delay or interference in difficult environments.
Do not confuse “wireless camera” with “wireless power.” Most wireless cameras still require connection to reverse-light power or another 12-volt circuit. Solar-powered units can be useful on equipment that sits outdoors, but their image availability depends on battery charge, sunlight, temperature, and standby settings.
Features that matter more than maximum resolution
- Night vision: Infrared LEDs help in darkness, but they do not turn a camera into a headlight. Glare from wet pavement, headlights, and reflective license plates can still reduce detail. A camera with good low-light sensitivity and a controllable exposure is often more useful than one with many infrared LEDs.
- Viewing angle: Around 120–150 degrees is suitable for most vehicles. Wider angles cover more area but make distances and shapes look distorted.
- Monitor size: A 4.3- or 5-inch screen suits a car. A 7-inch screen is a strong all-purpose choice for pickups and vans. Use 9 inches or more when towing or viewing a long vehicle, provided it does not block forward visibility.
- Weather resistance: IP67 means the enclosure is dust-tight and can tolerate temporary immersion under defined test conditions. It does not mean the camera can withstand a pressure washer at close range. IP68 may offer greater protection, but the manufacturer’s test conditions still matter.
- Guidelines: Fixed parking lines are only approximate. Dynamic lines that turn with the steering wheel are more useful, but they must be calibrated to the vehicle and should never replace mirrors or direct observation.
- Image mirroring: A rear-facing camera normally needs a mirrored image so left and right match the driver’s view. Verify this before installation, particularly with universal cameras.
Decision matrix for common buying situations
| Your situation | Recommended configuration | Why |
|---|---|---|
| Lowest practical cost | 720p wired camera, 5-inch monitor, IP67 housing | Fewer wireless components and adequate coverage |
| DIY installation with little trim-removal experience | Digital wireless camera, 5- or 7-inch monitor | Shorter cable run and fewer interior panels to remove |
| Daily commercial or work use | 1080p wired system, IP67/IP68 camera, 7-inch monitor | Stable signal and better detail over frequent use |
| Long trailer or camper | Trailer-specific wireless system with 7- to 9-inch display | Designed for distance and detachable connections |
| Snow, salt, mud, or frequent outdoor storage | Sealed camera, protected connector, replaceable lens cover if available | Reduces corrosion and keeps the image usable |
Installation details that prevent common failures
- Plan the camera view before drilling. Temporarily tape the camera in place and check that the bumper, hitch, or tailgate edge appears in the lower portion of the screen. If you cannot see a fixed reference point, distance is harder to judge.
- Use the correct reverse-light circuit. Confirm the voltage with a multimeter. Some vehicles use pulse-width-modulated lighting circuits that can cause flicker or camera shutdown; an interface or relay may be required.
- Protect every cable transition. Use rubber grommets through metal, flexible loom near hinges, and weatherproof connectors outside the cabin. Do not leave a connector hanging where water can run into it.
- Test in daylight and darkness. Check for a delayed image, excessive glare, unreadable guidelines, and a view blocked by the tailgate or cargo. Adjust the camera before permanently tightening it.
- Secure the monitor. A suction mount may be convenient, but a locking dash or windshield mount is safer for vehicles that travel over rough roads.
Ownership, cleaning, and expected wear
The lens is usually the first part to become frustrating rather than the electronics. Road film, sawdust, mud, and wax can create haze or bright halos around lights. Clean the lens with water and a soft microfiber cloth; abrasive paper towels and aggressive solvents can damage coatings or clear plastic. If the camera is mounted near a tailgate handle, check it after loading dusty materials.
Inspect the cable where it passes through a hatch or tailgate every few months. Repeated flexing can break internal conductors even when the outer insulation looks intact. Watch for intermittent video when the panel moves, which is an early warning sign. On wireless systems, inspect the power connection and confirm that the display starts promptly after selecting reverse.
A backup camera is an aid, not a substitute for mirrors, shoulder checks, or walking around the vehicle when the area is crowded. For most permanent installations, a wired 1080p system with a 5- to 7-inch monitor offers the best balance. For easier DIY work, choose a digital wireless model; for a large trailer or camper, choose a purpose-built system with a larger display and a verified long-range connection.