
What's inside
- What to look for in drum sander sandpaper
- Grit progression: the quickest route to an even surface
- Rolls versus precut strips
- Choosing by wood, workload, and machine
- What “3 inch sandpaper rolls” usually means
- Installation and maintenance steps that prevent uneven sanding
- Ownership costs and common mistakes
- Bottom line
- Related Guides
As an Amazon Associate I earn from qualifying purchases. This post may contain affiliate links at no extra cost to you.
The best drum sander sandpaper is a sharp, open-coat aluminum-oxide or ceramic abrasive on a firm cloth backing, bought in the correct width and length, with a grit sequence that removes stock without skipping more than one grit.
For most furniture, cabinet, and panel work, start with aluminum oxide in 80 or 100 grit, move to 120, and finish at 150 or 180. Choose ceramic abrasive when you need faster stock removal, work with hard timber, or run the machine frequently. The right sandpaper for a drum sander matters as much as the machine: an abrasive that loads quickly, stretches, or leaves a poor splice can create ridges and wasted material.
As an Amazon Associate we earn from qualifying purchases at no extra cost to you.
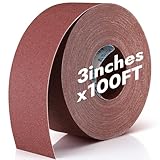


What to look for in drum sander sandpaper
Abrasive type
- Aluminum oxide: The best all-purpose choice for hardwood, softwood, plywood, and painted surfaces. It is widely available, reasonably priced, and forgiving during finish sanding.
- Ceramic alumina: The fastest-cutting option for removing mill marks, flattening glued panels, and sanding dense woods such as maple, white oak, ash, and hickory. It usually costs more but can stay productive longer.
- Zirconia alumina: A durable middle ground, useful for aggressive first passes and resinous or abrasive woods. Availability is more variable than aluminum oxide.
- Silicon carbide: Very sharp and suitable for some finish-sanding applications, but its brittle grains are less commonly chosen for routine drum-sander stock removal.
For typical shop use, a good aluminum-oxide roll is a better value than premium ceramic at every grit. Ceramic becomes easier to justify when the machine runs several times a week or when each project involves substantial thickness reduction.
Backing and splice design
Cloth backing is normally preferable to paper for a drum sander because it tolerates tension, repeated wrapping, and heat better. A firm J-weight or similarly heavy cloth backing stays flatter and is less likely to tear at the fastening slot. Flexible backing can conform well to the drum, but it may stretch and produce uneven tension if installed carelessly.
The splice is the joint where the abrasive strip becomes a loop. A properly made diagonal splice passes over the work gradually instead of striking it across the full width at once. Look for a low-profile, cleanly bonded joint with no lifted edge. A poorly aligned splice can leave a repeating line in the workpiece, especially at fine grits.
Use the drum sander manufacturer’s specified strip dimensions and splice direction. A roll is not automatically interchangeable with a precut loop: the length, fastening method, and winding direction must match the drum.
Grit progression: the quickest route to an even surface
Do not choose grits only by the final appearance of the abrasive. A drum sander works most efficiently when each successive grit removes the scratches from the previous one. Skipping too far leaves deep cross-grain marks that require extra passes.
| Project or starting condition | Recommended sequence | Typical final grit | Why |
|---|---|---|---|
| Rough glued panel, heavy milling marks | 60, 80, 100, 120, 150 | 150 | Fast flattening without asking fine abrasive to remove deep defects |
| Moderately smooth boards | 80, 100, 120, 150 | 150 | Good balance of speed and finish-readiness |
| Already planed furniture parts | 100, 120, 150, 180 | 180 | Removes planer marks while limiting unnecessary stock removal |
| End-grain or difficult hardwood panels | 60, 80, 100, 120, 150, 180 | 180 | Uses smaller jumps to control tear-out and visible scratches |
At each grit, continue until the previous scratch pattern is gone, but avoid repeatedly sanding one area after it is uniform. A drum sander removes material quickly, and excessive passes can reduce a panel below its target thickness.
Rolls versus precut strips
Drum sander sandpaper rolls usually offer the lowest cost per abrasive inch and let you cut replacement strips for multiple machines. They are particularly useful for a shop that uses several widths or keeps high-use grits on hand. The disadvantages are measuring, cutting, forming the splice, and storing the remaining roll without crushing its edges.
Precut strips cost more but reduce setup time and eliminate uncertainty about length. They are the safer choice for occasional users, unfamiliar machines, or drums with a manufacturer-specific attachment pattern. A precut strip is also less likely to be ruined by a slightly inaccurate cut.
As a useful comparison, suppose a 25-foot roll costs $45 and produces ten 30-inch strips. Its abrasive cost is about $4.50 per strip before any waste. If a pack of ten correctly sized strips costs $65, the precut option costs $6.50 each. The $2 difference may be worthwhile if cutting and splicing takes 10 minutes per strip and your shop time is valuable. Measure the usable roll length rather than assuming the advertised length is entirely recoverable.
Choosing by wood, workload, and machine
| Situation | Best abrasive choice | Practical format | Reasonable buying approach |
|---|---|---|---|
| Occasional DIY projects and softwood | Aluminum oxide, 80–150 grit | Precut strips | Buy only the grits needed for the current project |
| Regular furniture and cabinet work | Aluminum oxide, 80–180 grit | Rolls if dimensions are standard | Keep two spare strips in each frequently used grit |
| Hard maple, oak, or heavy flattening | Ceramic or zirconia for coarse grits; aluminum oxide for finishing | Rolls for high usage | Spend more on the first abrasive where cutting speed matters most |
| Limited workshop space | Aluminum oxide with cloth backing | Precut strips in a sealed container | Avoid storing large rolls that may be damaged or contaminated |
| Eight-inch floor drum sander, including EZ-8-type machines | Heavy-duty aluminum oxide or zirconia | Machine-specific precut strips or correctly sized rolls | Confirm the drum width, strip length, fastener slots, and splice orientation |
Searches for “EZ-8 drum sander sandpaper” or “EZ 8 drum sander sandpaper” often refer to abrasive strips for an 8-inch floor-finishing drum machine. These should not be confused with bench-top woodworking drum sanders, which commonly use different lengths, attachment slots, and abrasive widths. For any EZ-8-type floor machine, verify the exact model and manufacturer’s dimensions before ordering.
What “3 inch sandpaper rolls” usually means
Three-inch sandpaper rolls for a drum sander are appropriate only when the machine is designed for a 3-inch abrasive width or when the roll is being used for a compatible narrow-drum setup. A 3-inch roll cannot substitute for a wider strip merely because its grit is correct. Check three measurements: abrasive width, total loop length, and the shape and position of the attachment ends.
Some narrow drum and contour-sanding systems use rolls rather than closed loops, while conventional woodworking drum sanders generally require a strip wrapped around the drum and secured at both ends. If the manual specifies a continuous roll, follow that system; if it specifies a loop, do not improvise with loose abrasive that could catch or wrinkle.
Installation and maintenance steps that prevent uneven sanding
- Clean the drum: Remove dust and old adhesive from the fastening slots and drum surface. Debris under the abrasive creates a high spot.
- Check the strip: Confirm the grit, width, backing direction, and splice orientation before wrapping it.
- Install with even tension: Secure one end, wrap the strip squarely, and fasten the other end without stretching the abrasive excessively. Over-tensioning can distort the strip; under-tensioning causes wrinkles.
- Inspect the splice: Run a finger lightly along the edge while the machine is off. A lifted joint should be replaced rather than forced into service.
- Set a light first pass: Lower the drum gradually and let the abrasive cut. Heavy depth-of-cut settings create heat, loading, and premature wear.
- Clean between grits: Vacuum the table and surrounding area so coarse particles do not contaminate the finer abrasive.
Loading is the buildup of wood fibers, resin, finish, or pitch between abrasive grains. It is especially common with pine, cedar, oily tropical woods, and boards that still contain finish. Open-coat abrasives leave more space between grains and resist loading better, while stearate or “non-loading” treatments can help with some dry finishing work. They are not a cure for a clogged dust-collection system or an overly heavy cut.
Ownership costs and common mistakes
The abrasive usually wears before the machine does, but several habits shorten its life. Running a dull strip harder, sanding damp or resinous stock, using insufficient dust collection, and leaving a clogged abrasive on a hot drum all increase replacement costs. Replace a strip when it stops cutting efficiently, shows torn edges, or produces heat and burnishing despite a light cut.
Do not use a drum sander to compensate for badly cupped stock, and do not expect it to remove deep planer ridges in one pass. Flattening safely means rotating or alternating boards as appropriate, supporting narrow work, and checking thickness with calipers. Keep spare abrasive sealed and stored flat or on its original core; crushed edges and moisture can make a new roll unusable.
Bottom line
For most woodworkers, buy cloth-backed open-coat aluminum-oxide drum sander sandpaper in 80, 100, 120, 150, and optionally 180 grit. Choose ceramic for frequent heavy removal and hard woods, precut strips for convenience, and rolls when your machine dimensions are standard and consumption is high. Before ordering, match the abrasive width, loop length, fastening method, and splice direction to the exact drum—not simply the grit printed on the package.