
What's inside
- Best Laser Cutters for Acrylic: Flame-Polished Edges, No Melt
- Quick picks by situation
- Best acrylic laser cutter categories
- Cast versus extruded acrylic: the edge-quality comparison
- How much wattage do you need?
- Features that prevent melting and rough edges
- Setup method for a cleaner laser cut acrylic edge
- Ownership costs and maintenance realities
- Final buying recommendation
- Related Guides
As an Amazon Associate I earn from qualifying purchases. This post may contain affiliate links at no extra cost to you.
Best Laser Cutters for Acrylic: Flame-Polished Edges, No Melt
For clean, flame-polished edges, choose a CO2 laser cutter for acrylic rather than a blue-diode machine: around 40–60W is the practical range for 3mm and 6mm sheet, while 80–100W is the better choice for reliable single-pass cuts through 10mm acrylic.
The most important buying decision is not wattage alone. Acrylic type, air assist, focus accuracy, bed size, extraction, and the ability to control speed and power all affect whether an edge looks glossy and smooth or cloudy, melted, and ridged.
As an Amazon Associate we earn from qualifying purchases at no extra cost to you.



Quick picks by situation
| Situation | Best machine type | Recommended power | Why it fits |
|---|---|---|---|
| Occasional signs and small decorations | Enclosed desktop CO2 acrylic laser | 40–55W | Enough power for 3mm and most 6mm work without requiring an industrial footprint |
| Regular craft production | Enclosed 60–80W CO2 laser | 60–80W | Faster cutting, larger beds, and better capacity for repeated jobs |
| 10mm panels or frequent production | Production CO2 laser | 80–100W+ | More practical for single-pass work and reduces slow, heat-heavy settings |
| Very small budget or engraving only | Diode laser, with material testing | 10–20W optical output | Useful for some dark or opaque plastics, but generally unsuitable for clear acrylic cutting |
Best acrylic laser cutter categories
Desktop CO2 machines: the sensible choice for most makers
A compact enclosed CO2 laser is the best all-round acrylic laser cutter for a home workshop, school, or small sign business. Machines in the 40–60W class commonly offer a bed around 300 x 500mm or 400 x 600mm, while larger models may provide 600 x 900mm or more.
Examples include the Glowforge Pro, OMTech Polar and comparable enclosed CO2 machines from established manufacturers. Product specifications vary by revision, so check the actual tube power, working area, cooling system, exhaust connection, and software requirements rather than relying on the model name.
These machines are particularly good for 3mm cast acrylic, lettering, ornaments, display panels, and layered signs. A 40W unit can cut this material quickly, while a 60W model gives more speed headroom and handles 6mm sheets more comfortably.
Production CO2 machines: better for thick sheet and repeat work
For frequent acrylic laser cutting, a larger machine with an 80–100W tube is usually a better investment than pushing a small laser at slow speeds. Thunder Laser Nova and Trotec Speedy systems are examples of production-oriented CO2 platforms, although their prices and configurations vary widely.
The advantage is not simply cutting depth. A stronger machine can use a faster pass, which limits the time heat remains in the kerf. That can reduce edge distortion, especially on 6mm and 10mm sheet. These systems also tend to offer better motion hardware, more effective air assist, honeycomb or knife beds, and more convenient maintenance access.
Diode lasers: attractive price, limited acrylic compatibility
Blue-diode lasers are inexpensive and compact, but clear acrylic transmits much of the diode wavelength instead of absorbing it. That makes them a poor general-purpose laser cutter for acrylic. Some diode machines can cut black, dark, or specially formulated opaque acrylic, but results depend heavily on the sheet.
If clear, white, transparent colored, or fluorescent acrylic is central to your projects, start with a CO2 machine. A diode unit may still be useful for wood, leather, cardboard, and engraving, but it should not be your first choice for acrylic laser cutting.
Cast versus extruded acrylic: the edge-quality comparison
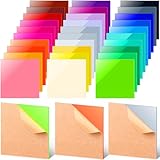
Cast acrylic is generally the best acrylic for laser cutting when the finished edge matters. It vaporizes more predictably, produces a bright polished edge, and is less likely to show a pronounced melted lip. It is also widely available in transparent, translucent, fluorescent, and opaque colors.
Extruded acrylic is made by pushing the material through a die. It is often cheaper and more consistent in thickness, but it tends to soften and melt more readily during cutting. Edges can be less glossy, more wavy, or slightly rounded, particularly when the machine is underpowered or the sheet is not held flat.
| Material | Typical cost position | Laser-cut edge | Best use | Common problem |
|---|---|---|---|---|
| Cast acrylic | Medium to high | Bright, smooth, flame-polished appearance | Signs, awards, visible edges, precision parts | Thickness variation between batches |
| Extruded acrylic | Low to medium | Clean but usually less glossy and more heat-sensitive | Spacers, prototypes, internal parts, budget projects | Melting, burrs, stress marks, rounded edges |
“Flame-polished” describes the appearance created by the laser’s concentrated heat; it does not mean the sheet should be finished with a torch. Applying a flame after cutting can introduce stress, bubbles, discoloration, and fire risk.
How much wattage do you need?
The figures below are practical starting ranges for a properly aligned CO2 laser using cast acrylic, a clean lens, focused optics, and air assist. They are not universal recipes: tube age, focal length, bed design, material color, masking, and machine motion speed can change the result.
| Acrylic thickness | Practical minimum | Recommended for clean single-pass work | Typical starting speed range |
|---|---|---|---|
| 3mm | 30–40W | 40–60W | 15–30 mm/s |
| 6mm | 50–60W | 60–80W | 5–15 mm/s |
| 10mm | 80W | 100W or more | 2–8 mm/s |
These speed ranges are deliberately broad. A 60W machine may cut 6mm cast acrylic in one pass, but a 40W machine may need a slower setting or a second pass. Multiple passes can leave a more tapered edge and add heat, so a stronger laser is preferable when production quality matters.
As a simple buying calculation, suppose a 60W machine cuts a 600mm-long 6mm outline at 10mm/s. The motion time is about 60 seconds, before acceleration, cornering, and setup. If a 40W machine must run at 5mm/s for the same cut, the motion time roughly doubles. For occasional projects that difference is minor; for 100 parts, it becomes more than an hour of additional cutting time.
Features that prevent melting and rough edges
- Adjustable air assist: A steady air stream clears vapor, reduces flare-ups, and helps keep the cut cooler. Too much air can disturb small parts, so adjustable flow is useful.
- Accurate autofocus or reliable manual focus: Focus errors are especially visible in thick acrylic. A slightly defocused beam widens the kerf and can leave a frosted or tapered edge.
- Suitable bed support: Knife blades or a clean honeycomb bed reduce reflections and allow smoke to escape beneath the sheet.
- Rigid motion system: Belt or rail play creates inconsistent kerf width and misaligned corners. This matters more on interlocking parts than on simple signs.
- Effective exhaust: Acrylic fumes must be captured and vented outdoors through an appropriate system. Never cut unknown plastic, PVC, vinyl, or materials containing chlorine.
- Pass-through clearance: Useful for long signs, but confirm whether the opening preserves alignment and enclosure safety.
Setup method for a cleaner laser cut acrylic edge
1. Confirm the sheet
Check that the material is acrylic, not PVC or an unidentified plastic. Record whether it is cast or extruded and measure its actual thickness with calipers. Remove protective film only where the manufacturer permits it; paper masking can reduce residue on the face of the sheet.
2. Clean and focus the optics
Dirty lenses absorb power and create uneven cuts. Clean the lens according to the machine manufacturer’s procedure, then focus at the material’s top surface or the recommended point for the sheet thickness. Confirm that the bed is level.
3. Run a small test grid
Cut a small rectangle using several speed and power combinations. Look at the underside: a clean single-pass cut should separate without heavy charring, a wide melted ridge, or an uncut lower section. Test every new color and thickness because pigments and additives change absorption.
4. Keep the sheet flat
Warped acrylic changes the focus distance across the job. Use clean weights outside the cutting path, a suitable hold-down method, or a flat bed. Do not place combustible objects over the sheet to hold it down.
5. Inspect the kerf before production
Check whether slots fit and whether corners remain square. A wider kerf can make press-fit parts loose, while excessive heat can shrink narrow features. Adjust the drawing for the measured kerf rather than assuming the nominal laser spot size.
Ownership costs and maintenance realities
The tube is the major consumable in a glass-tube CO2 machine. Its service life varies with operating conditions, cooling, current, and quality, but budgeting for eventual replacement is sensible. Mirrors and lenses gradually collect residue and may need cleaning or replacement. Air-assist pumps, exhaust fans, water chillers, belts, and bed surfaces also wear before the machine itself is obsolete.
For a realistic ownership budget, plan for an exhaust setup, spare optics, cleaning supplies, a suitable chiller where required, and replacement tubing or ducting. A lower-priced machine can become expensive if it lacks reliable cooling or arrives poorly aligned.
The most common causes of melted acrylic are an incorrect material setting, a dirty lens, weak or missing air assist, poor focus, excessive power at too-low a speed, and trying to cut extruded sheet with a recipe intended for cast sheet. Cleaning the optics and keeping a material-specific test library often improves results more than simply increasing wattage.
Final buying recommendation
Choose a 40–60W enclosed CO2 laser for 3mm acrylic and occasional 6mm work, preferably with air assist, autofocus, dependable exhaust, and a bed at least 300 x 500mm. Move to 60–80W if 6mm sheet is routine. For 10mm acrylic and frequent production, an 80–100W production CO2 machine is the more dependable choice.
Use cast acrylic when you want the clearest, brightest laser-cut edge. Choose extruded acrylic when price, availability, or dimensional consistency matters more than a polished appearance. With the right material and a properly focused CO2 laser, the result can be a clean single-pass cut rather than a melted compromise.