
What's inside
- Contents
- What pipe clamps are, and why people still use them
- Types of pipe clamps and alternatives
- Choosing the pipe
- Choosing the fixtures
- How many clamps and what lengths
- Using pipe clamps for a clean glue-up
- Care, storage, and safety
- Common mistakes
- Who should choose what
- Checklist
- Frequently asked questions
- Conclusion
As an Amazon Associate I earn from qualifying purchases. This post may contain affiliate links at no extra cost to you.
Short answer: For wide panel glue-ups, tabletops, and large cabinet assemblies on a sensible budget, pipe clamps are hard to beat. The best setup for most woodworkers is a set of three-quarter-inch clamp fixtures with sturdy cast heads, a smooth-turning screw handle, and lengths of threaded black pipe cut to the sizes you actually use. Choose half-inch fixtures only for lighter work. If you want flatter pressure and easier use on delicate projects, consider adding a few parallel-jaw clamps to the mix.
Our Top Picks

Contents
- What pipe clamps are, and why people still use them
- Types of pipe clamps and alternatives
- Choosing the pipe
- Choosing the fixtures
- How many clamps and what lengths
- Using pipe clamps for a clean glue-up
- Care, storage, and safety
- Common mistakes
- Who should choose what
- Checklist
- FAQ
- Conclusion
What pipe clamps are, and why people still use them
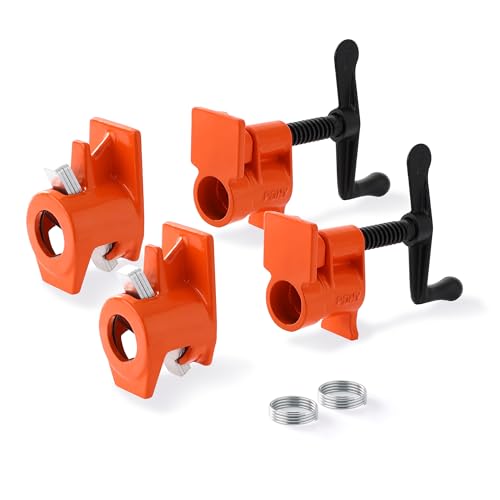
A pipe clamp is a two-part tool. One fixture, the head, carries a screw and a pressure plate, and it threads onto the end of a length of pipe. The other fixture, the tail, slides along the pipe and locks in place with a clutch mechanism. Turn the screw and the jaws close with considerable force. Because the pipe is separate, you can swap lengths without buying a whole new clamp.
That flexibility explains their staying power. A bar clamp built to span four feet is a specialized and often expensive item, while a pair of fixtures plus a piece of pipe can reach the same distance for much less. Woodworkers building doors, tabletops, workbench slabs, and casework use them constantly. They are heavy and sometimes awkward, and they are not the gentlest clamp for fine work, but they are strong, repairable, and easy to customize.
Types of pipe clamps and alternatives
The table below compares the main categories of pipe clamp and the tools that compete with them, by type rather than by brand.
| Type | How it works | Strengths | Limits |
|---|---|---|---|
| Three-quarter-inch fixtures on black pipe | Heavy cast head and tail on stiff pipe | High clamping force, stiff, widely available, long reach | Heavy; pipe can stain wood; jaws are small |
| Half-inch fixtures on black pipe | Lighter version on smaller pipe | Lighter and easier to handle | Pipe flexes more, lower force; best for small work |
| Pre-assembled pipe clamp with pipe | Fixtures sold with a set length of pipe | Ready to use | Fixed length, may not suit every project |
| Double-pipe clamp | Two parallel pipes joined by heads | Resists twisting, keeps jaws square | Bulkier and less common |
| Bar clamp (flat or I-beam) | One steel bar with a sliding tail | Lighter than pipe, convenient to store | More expensive per foot of reach; bar length is fixed |
| Parallel-jaw clamp | Wide, square jaws on a rigid bar | Even pressure and clamping faces that stay square | Costly; less reach; heavy |
Black pipe versus galvanized pipe
Black steel pipe is the common choice for clamps. It is inexpensive and is available at most plumbing and hardware suppliers. It often has a light oily coating and mill scale that can mark wood, particularly when the wood is damp from glue. Galvanized pipe has a zinc coating that resists rust and is less likely to leave dark stains, but zinc can flake and wears over time. Whichever you pick, wipe the pipe clean and keep it away from unfinished wood surfaces with a barrier such as wax paper, painter’s tape, or a thin plastic sleeve.
Threaded versus unthreaded
The head fixture threads onto the end of the pipe, so you need pipe that is threaded at one end at least. Hardware suppliers commonly sell pipe in standard lengths, and some will cut and thread to a custom length. The tail fixture slides on the unthreaded section. If you cut pipe yourself, you need the right tools and care, and you should deburr the cut end so the tail slides smoothly.
Fixture quality
Fixtures come in cast iron or stamped steel varieties. Cast heads tend to be stiffer and withstand tighter clamping, while very light stamped parts may flex. Look for smooth screw action, a clutch that grabs the pipe without slipping, and a handle that does not bind. Some include rubber pads or swivel caps that protect wood and keep pressure centered.
Choosing the pipe
Pipe diameter is the main determinant of stiffness. Three-quarter-inch pipe resists bowing far better than half-inch. For long panels, that stiffness helps spread pressure across the glue joint instead of bowing the boards at the middle. Shorter work such as a small box or frame can use half-inch pipe without trouble.
The pipe should be straight. Roll it on a flat surface and look for bends or flat spots. A pipe that is out of true makes the clutch slip and the clamp rock. Inspect threads at the head end for burrs, and chase them with a die if needed.
Pipe length is a decision about the work you do. A mix of lengths will serve most shops: shorter pieces for frames and boxes, mid-length for door and cabinet work, and a few long ones for tabletops. Because pipe is cheap relative to fixtures, you can buy fixtures once and change lengths as projects change.
A clean pipe is a better pipe. Before each use, wipe off oil and rust, and consider a light coat of paste wax so the clutch grips consistently and glue squeeze-out does not bond to the surface. Avoid heavy lubricants on the part of the pipe where the tail clutch rides, since oil can make it slip.
Choosing the fixtures
Head and tail design
Look for a head with a thick screw boss and a firm threaded collar that tightens onto the pipe. The tail should lock quickly when pressure is applied and release easily when the clamp is loosened. A tail that sticks in the locked position or slips under load is annoying and can ruin a glue-up.
Screw and handle
A fine thread gives smooth pressure with less effort. A longer handle gives leverage, but resist the temptation to overtighten, since more pressure squeezes glue out of the joint and can weaken it. A handle that turns with a comfortable grip and a screw end that swivels will save wear on your hand and the work.
Jaw faces and pads
Many fixtures come with a plain metal face. Rubber or plastic pads reduce marring, and scrap wood blocks, called cauls, spread pressure and protect edges. If your fixtures do not include pads, use blocks of softwood between the jaws and the work.
Interchangeability
Fixtures sized for three-quarter-inch pipe will not fit half-inch pipe, and vice versa. The labels refer to nominal pipe size, which does not equal outer diameter, so buy fixtures and pipe that are described as compatible.
How many clamps and what lengths
A panel glue-up needs clamps spaced along the joint at intervals that keep boards tight without bowing them. A common starting point is one clamp every twelve inches or so, though dense hardwoods and long boards may need more. Alternate clamps above and below the panel so the opposing forces cancel any tendency to bow. For a tabletop, that often means a clamp set on each side of the panel, plus cauls across the top to keep the surface flat.
Think in terms of lengths you will reuse:
- Short (about two feet): frames, boxes, and small assemblies.
- Medium (three to four feet): doors, face frames, and cabinet sides.
- Long (five feet or more): tabletops, bench slabs, and wide panels.
If you are starting from nothing, a handful of medium clamps handles a surprising range of work. Add long ones when a project calls for them. Because the pipe is detachable, you can also make a long clamp by pairing fixtures with a coupling and two shorter pieces, though a joint in the pipe reduces stiffness.
Using pipe clamps for a clean glue-up
- Dry fit first. Arrange boards, check the joints, and mark the order. Practice clamping without glue so there are no surprises.
- Prepare the pipe. Wipe it clean. Cover it, or cover the bench, with wax paper or plastic so glue and iron stain cannot touch the wood.
- Set the clamps on the bench. Lay the pipes flat with the heads at one end and the tails on the other. Raise the work on the pipe or on blocks so the clamp screw is centered on the board thickness.
- Apply glue. Spread an even film on mating edges.
- Bring the joints together. Tighten clamps from the center outward, a little at a time, until a thin bead of glue appears along the joint.
- Check alignment. Use cauls or a straightedge across the top to keep boards flush. Adjust before the glue sets.
- Clean the squeeze-out. Remove excess glue as the maker’s instructions advise, using a scraper or damp cloth.
- Wait. Leave the clamps on for the time recommended for your glue, then remove them gently.
Raising the work off the bench by a half-inch or so keeps the boards from dragging and keeps the pressure line near the center of the thickness. Clamp pressure applied off-center can cause the boards to lift or slide at the joint.
Care, storage, and safety
Care
Wipe off glue before it hardens. Dried glue on pipe makes the tail slide badly and can mar the next project. Rust can be removed with an abrasive pad followed by a light coat of paste wax. Keep the screw threads clean and apply a little light lubricant. A drop of oil on the screw is fine, but keep it off the pipe where the tail grips.
Storage
Pipe clamps are heavy, and a rack holds them better than a pile on the floor. A wall-mounted rack with strong brackets keeps them organized and prevents bent pipe. Store pipes horizontally so they stay straight. Support long pipes at several points.
Safety
- Keep fingers out of the gap between jaw and work when tightening; pinch points are real.
- Wear safety glasses when removing clamps from a stuck joint, and wear gloves when handling rough or rusty pipe.
- Do not use pipe clamps to pull heavily distorted frames or to lift anything. They are for clamping, not hoisting.
- Do not exceed the force the pipe and fixture can safely bear. A bowed pipe or a cracked fixture is a sign to stop and replace the part.
- Lift long, heavy clamps with a firm grip and watch for tipping. A falling pipe clamp can injure a foot.
- If you cut or thread pipe, follow the safety instructions for the tool you use, wear eye and hearing protection, and deburr the ends.
Common mistakes
- Using too few clamps. Gaps appear between clamps, and the joint opens up. Add clamps rather than tightening existing ones harder.
- Over-tightening. Excessive force starves the joint of glue and can bow the panel.
- Letting iron touch damp wood. Black stains from iron and tannin-rich woods are hard to remove. Use barriers.
- Clamping off-center. The panel cups or the boards slide. Center the pressure line and use cauls.
- Using half-inch pipe on long, wide panels. It flexes and fails to deliver even pressure.
- Letting glue dry on the pipe. It spoils the next glue-up and makes the clutch skip.
- Mixing mismatched parts. Fixtures and pipe from different sizes will not fit well.
Who should choose what
| If you are… | Consider | Why | Watch out for |
|---|---|---|---|
| Gluing up tabletops and benchtops | Three-quarter-inch fixtures with long, straight black pipe | Stiff, strong, and economical | Iron stains and weight |
| Building small boxes and picture frames | Half-inch fixtures or small bar clamps | Light and easy to handle | Flex on longer spans |
| A beginner on a budget | A few medium three-quarter-inch clamps | Covers many projects for modest cost | Buying fixtures and pipe that do not match |
| A cabinetmaker who needs squareness | Parallel-jaw clamps plus a few pipe clamps | Square jaws help case assembly | Higher cost and weight |
| Someone with limited storage | Short pipes and a few fixtures that you can recombine | Pipes stack or store compactly | Must reassemble for each project |
Checklist
- Decide on three-quarter-inch or half-inch pipe based on the biggest panels you build.
- Buy fixtures and pipe that are described as compatible.
- Inspect pipe for straightness and clean threads.
- Choose a mix of short, medium, and long lengths.
- Prepare cauls, wax paper, and scrap blocks for protecting wood.
- Wipe oil and rust from pipe before gluing.
- Wear eye protection and keep fingers clear of pinch points.
- Plan a rack to store pipe straight and off the floor.
Frequently asked questions
Are pipe clamps strong enough for tabletop glue-ups?
Yes, three-quarter-inch pipe clamps are widely used for wide panels. Use enough of them, alternate them above and below, and add cauls so the panel stays flat.
Should I choose half-inch or three-quarter-inch fixtures?
Three-quarter-inch is the more versatile choice, with stiffer pipe and greater clamping force. Half-inch is lighter and fine for small assemblies.
Why does black pipe stain my wood?
Iron in the pipe and its coating can react with moisture in glue and with tannins in woods like oak, leaving dark marks. Keep wood off the pipe using wax paper, tape, or a plastic sleeve.
How tight should I clamp?
Tighten until the joint closes and a thin bead of glue appears, then stop. Squeezing harder does not make a better joint and can bow the panel or starve the glue line.
Can I use any pipe with any fixture?
No. Fixtures are made for a specific nominal pipe size. Make sure the fixtures and the pipe are described as compatible, and check that the threads engage fully.
How do I stop the tail from slipping?
Clean the pipe, remove oil from the surface where the clutch grips, and check that the pipe is straight. If slipping continues, the clutch plates may be worn and the tail may need replacing.
Are pipe clamps better than bar clamps?
Each has strengths. Pipe clamps are economical and adjustable in length, while bar clamps are lighter and easier to store. Many shops use both.
How should I store pipe clamps?
Hang them on a sturdy wall rack or lay pipe horizontally on supports. Keep them dry to limit rust, and avoid stacking heavy clamps in a way that bends the pipe.
Conclusion
The best pipe clamps are the ones that match your work: three-quarter-inch fixtures on straight, clean pipe for large glue-ups, lighter half-inch sets for small assemblies, and a few parallel-jaw clamps if square assemblies matter to you. Buy matching parts, keep the pipe clean and waxed, and use enough clamps with moderate pressure. That approach gives you strong, flat glue-ups without spending much.
To get started, look at a pair of pipe clamp fixtures, a few lengths of threaded pipe, and a stack of clamp pads. For squarer work, parallel-jaw clamps are a worthwhile addition.
Disclosure: As an Amazon Associate, jd-woodworks.com earns from qualifying purchases. If you click a link marked as sponsored and buy, we may receive a small commission at no extra cost to you.