What's inside
As an Amazon Associate I earn from qualifying purchases. This post may contain affiliate links at no extra cost to you.
Connecting a table saw and planer to one dust collector is mostly a sizing and layout problem. The fittings need to match the machines, keep the duct path open, and let you switch tools without dragging a hose across the floor. A reducer that fits physically can still choke airflow, so measure the ports and plan the route before buying adapters.
As an Amazon Associate we earn from qualifying purchases at no extra cost to you.


Measure the tool ports first
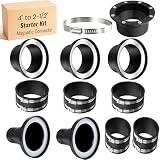
Check each tool’s manual and measure the outside diameter of the dust port. “Four-inch” fittings are not all identical: some ports are close to 4 inches, while others are metric or shaped to accept a flexible hose. Measure the collector inlet too. Record both the diameter and whether each connection is a male spigot or a female socket; two same-size ends may not join without a coupler.
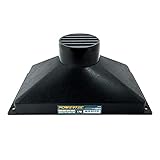
A table saw may have a lower cabinet port and a smaller blade-guard port. If both are usable, a Y fitting can connect them, but the guard branch usually needs a smaller hose. A planer commonly has a single large port and ejects chips quickly. Check its manual for the required airflow and minimum duct size rather than assuming that a reducer will work because it fits.
Choose a trunk and branches
For a typical small-shop collector with a 4-inch inlet, use 4-inch smooth-wall pipe or hose for the main run where practical. Put a blast gate at each machine branch so the inactive tool does not bleed airflow. Keep the branch to the planer as large and short as its port allows; planers can overwhelm a small hose with chips. If a machine has a 2½-inch port, a short reduction at that machine is usually better than reducing the entire system to 2½ inches.
Use a wye rather than a square tee where branches meet. A wye turns the airstream more gradually and is less likely to catch chips. Aim the branch in the direction of airflow. Long runs of corrugated hose add resistance and create places for shavings to snag, so reserve flexible hose for machine movement and final connections. If the layout needs several metres of flexible hose, rigid pipe may be worth the extra effort.
For a basic setup, compare 4-inch dust-collection wyes and blast gates with the sizes you measured. Avoid buying a large assortment before confirming the end types and actual diameters.
Fittings compared
| Fitting | Best use | Common drawback |
|---|---|---|
| Smooth rigid pipe | Long main runs and fixed branches | Needs supports and careful measuring |
| Flexible dust hose | Short connections to moving or adjustable tools | Corrugations restrict flow, especially over long lengths |
| Wye | Joining a machine branch to a main run | Takes more room than a tee |
| Reducer | Matching a smaller machine port to a larger hose | Can limit airflow if undersized or placed too far upstream |
| Blast gate | Shutting off unused branches | Sawdust can jam the slide if it is installed where chips settle |
Hose, reducers, and adapters
Use a smooth-bore hose when you need flexibility, such as between a fixed branch and a table saw cabinet that moves slightly for service. A short corrugated hose is cheaper and perfectly adequate for a connection of roughly 1–2 feet. For longer connections, the added drag can noticeably reduce pickup, particularly at the planer. A smooth-wall dust-collection hose costs more and is stiffer, but is easier to clean and less restrictive than heavily ribbed hose.
Reducers are sometimes unavoidable. Put them near the machine port, not at the collector, so the main run stays as large as possible. Avoid stacking reducers, stepped adapters, and tight elbows together. Each transition adds turbulence and a spot where planer shavings can collect. If chips repeatedly clog a reducer, move up a size or shorten the restricted section rather than adding more suction accessories.
Plastic adapters are convenient for nonstandard ports, but check that they seat securely and do not collapse under suction. For a port that is only slightly oversized, a proper rubber coupling with clamps can be a sturdier, low-cost fix. Do not rely on tape as the permanent joint: vibration and dust eventually loosen it.
Gates, sealing, and layout
Install gates where you can reach them without stepping over the hose. Open only the branch serving the active machine. A gate that is difficult to reach tends to stay open, splitting airflow between the saw and planer and weakening capture at both. Choose gates that match the duct diameter, and check the slide after the first few sessions; fine dust can pack into the track, while damp chips can make it stick.
Seal joints with foil HVAC tape or a suitable sealant on the outside of the duct. Do not leave tape lips or screws projecting into the airstream, where they can snag chips. Support rigid pipe at regular intervals—about every 4 feet is a practical starting point—and avoid sharp bends. If the collector is connected to both machines but dust still escapes, inspect loose joints, blocked gates, and the tool’s internal passages before buying a more powerful collector.
A practical buying plan
For a short run and one machine used at a time, a basic 4-inch blast gate, a wye, and short lengths of hose may be all you need. The cheaper flexible-hose option is fine when the runs are short and the planer does not clog. Spend more on rigid pipe or smooth-wall hose when the route is long, bends are unavoidable, or chip pickup is consistently poor.
Before ordering, make a simple parts list: collector-to-trunk connection, wye, one gate per tool, any machine-specific reducer, and the shortest practical hose sections. Dry-fit the system first. If the planer’s manual calls for more airflow than your collector can provide, fittings alone will not solve the problem; an undersized collector remains the limiting part.