What's inside
As an Amazon Associate I earn from qualifying purchases. This post may contain affiliate links at no extra cost to you.
A jointer produces chips differently from a tablesaw or sander. The cutterhead throws waste sideways and downward, while the board itself can block part of the airflow. A good dust collection hood must catch that fast-moving stream without restricting the cut, snagging the board, or becoming a place where shavings pile up.
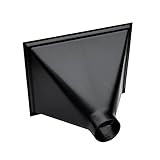
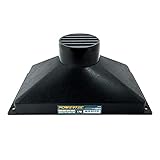
For most shops, the best starting point is a hood with a wide rectangular opening, a short tapered transition, and a round outlet sized for the dust collector. Shape matters, but opening area, placement, and airflow usually matter more than a fancy enclosure.
As an Amazon Associate we earn from qualifying purchases at no extra cost to you.

What the hood needs to capture
Jointer chips are larger and heavier than sanding dust. They need enough air velocity to stay moving through the hose. A typical 6-inch jointer benefits from roughly 400 to 600 cubic feet per minute at the machine inlet. A small 4-inch setup may work acceptably around 300 to 400 CFM, but performance drops quickly with long hoses, sharp bends, undersized fittings, and clogged filters.
The hood should enclose the cutterhead as much as practical while leaving clearance for the board and adjustment mechanisms. It should not rely on a narrow slot directly under the knives. That design may look efficient, but the opening clogs easily when damp or stringy shavings bridge across it.
Keep the duct run short. A 4-inch hose running 10 feet with two tight bends can deliver far less air than the same collector connected through a short, smooth fitting. Use a blast gate near the machine, seal gaps around the hood, and ground flexible hose if static buildup is a recurring problem.
The best hood shapes for a jointer
| Hood shape | Best use | Strengths | Weaknesses |
|---|---|---|---|
| Wide rectangular box | Most benchtop and floor jointers | Large capture area, simple to build, handles uneven chip streams | Can be bulky; needs a good transition to round duct |
| Tapered wedge | Permanent installations with limited space | Encourages airflow toward the outlet and fits under the cutterhead | More difficult to build; narrow ends can clog |
| Curved or semicircular hood | Factory-style replacements and tight clearances | Good airflow and fewer internal corners | Harder to fabricate accurately; usually not worth the effort in a small shop |
| Open funnel or scoop | Temporary or low-cost setups | Cheap and quick; easy access for cleaning | Leaks chips, loses suction, and offers poor containment around the cutterhead |
Wide rectangular hoods: the safest general choice
A wide rectangular hood is usually the most forgiving design. Make the opening approximately as wide as the cutterhead housing and at least 1.5 to 2 inches taller than the largest normal chip path. For a 6-inch jointer, an opening around 7 by 4 inches is a practical starting point, provided it does not interfere with the table or depth-adjustment hardware.
The opening should sit close to the cutterhead, commonly within 1/2 to 1 inch where the machine’s geometry allows. Too much distance creates dead air around the knives. Too little clearance risks contact with the spinning cutterhead or chips that cannot escape.
Round the inside corners or use a sloped back panel. Square internal corners collect shavings and gradually reduce the opening. A 6-inch outlet is preferable for a larger floor jointer, while a 4-inch outlet can serve smaller machines if the collector can maintain useful airflow. Do not reduce a 6-inch outlet to 2-1/2 inches just because that hose is already in the shop; the restriction usually creates disappointing results.
Tapered and curved designs
A tapered wedge can improve airflow when the outlet must sit close to the cutterhead. The broad end surrounds the chip stream, and the walls narrow gradually toward the duct connection. Keep the taper gentle rather than making a sharp funnel. A sudden reduction causes turbulence and gives chips a place to settle.
As a practical rule, avoid reducing the cross-sectional area by more than about half in a short transition. If the hood opening is roughly 28 square inches, a 4-inch round outlet provides about 12.5 square inches. That reduction can work, but the transition should extend several inches and use sloped sides. A 6-inch round outlet, at about 28 square inches, creates a much easier airflow path.
Curved hoods perform well because they eliminate corners, but they are rarely necessary for a home workshop. Thin plywood, sheet metal, or durable plastic can form a serviceable curve, yet the extra fabrication time is better spent sealing leaks and improving the duct run.
Materials and build details that matter
For a fixed hood, 1/2-inch plywood with sealed edges is inexpensive and rigid. Sheet metal is thinner and resists chip abrasion, but its edges need folding, crimping, or protective trim. Avoid brittle plastic that can crack when struck by a board or dropped tool.
Make the hood removable with screws, threaded inserts, or a simple latch. Jointer knives need inspection and replacement, and a permanent enclosure turns routine maintenance into a frustrating job. Add a cleanout panel if the outlet enters a narrow cavity.
Seal joints with polyurethane adhesive, silicone, or foil HVAC tape. Ordinary cloth duct tape dries out and leaks. A hood that leaks around every seam can lose more performance than one with a slightly imperfect shape.
When to buy and when to build
Buy a replacement hood when the manufacturer offers one that matches the cutterhead housing. It will usually preserve table movement and guard clearance better than a homemade part. Search for jointer dust collection hoods when you need a basic replacement or want to compare dimensions.
Build your own when the original hood is missing, the jointer is an older machine, or the factory outlet is clearly undersized. A simple plywood box often costs less than a specialty replacement and can be adapted to a 5- or 6-inch duct. For sealing and vibration control, dust collection hose couplers and clamps are useful shop-stock items.
The cheaper open scoop is fine for occasional rough work if you sweep chips manually and wear eye protection. It is not a good choice for production jointing, a cramped shop, or a collector shared with other machines. Choose the wide rectangular hood first, then improve the transition and ducting if capture remains poor.
Testing the finished hood
With the collector running, hold a small strip of tissue near the hood perimeter. It should pull inward around the opening rather than flutter outward. Joint a short board and inspect the floor, cutterhead cavity, and hose entrance. Chips landing directly in front of the machine indicate poor positioning; chips piling inside the hood indicate a restriction or abrupt transition.
Never test capture with your hand near the cutterhead. Disconnect power before reaching inside, removing a blockage, or changing knives. A dust hood improves cleanup, but it does not replace a guard, proper push blocks, hearing protection, or safe stock-handling technique.