What's inside
As an Amazon Associate I earn from qualifying purchases. This post may contain affiliate links at no extra cost to you.
Detailed repairs need light that stays where you put it. A ceiling fixture can illuminate the bench, but it usually leaves shadows under a carburetor, inside a gearbox, or behind a hand holding the work. An adjustable bench light adds close, directional light without taking up the floor space of another shop fixture.
The best setup is usually a stable lamp with a long arm, a wide shade, and enough brightness to reveal scratches, burrs, labels, and small fasteners. It should also tolerate dust, occasional oil splashes, and the vibration caused by sanding or nearby power tools.
As an Amazon Associate we earn from qualifying purchases at no extra cost to you.
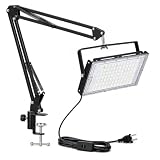

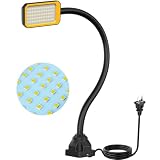

What Matters Most in a Workshop Bench Light
Stability comes first. A lamp that slowly droops is more frustrating than a slightly dimmer lamp that stays aimed. Look for a weighted base, a clamp with a broad jaw, or an articulated arm with joints that can be tightened. A clamp should open at least 2 inches for most benches, and its contact pads should not crush a laminated edge or slide on a steel top.
Choose useful brightness, not just a high lumen number. For close repair work, roughly 800 to 1,500 lumens at the work surface is a practical range. More can help when inspecting dark parts, but excessive brightness causes glare on polished metal and makes your eyes work harder. A diffuser is valuable because bare LED points create harsh reflections.
Color temperature affects inspection. Neutral white light around 4,000K to 5,000K makes grease, rust, pencil marks, and wire colors reasonably easy to distinguish. Very cool 6,500K light can look bright but often feels harsh. Warm 2,700K to 3,000K light is comfortable for general illumination but less useful for spotting fine surface defects.
Use a CRI of 80 or higher. A CRI of 90 or more is preferable when you identify wire insulation, paint colors, heat discoloration, or small stains. Color accuracy does not replace brightness, but poor color rendering can hide the difference between a clean machined surface and one with a thin oil film.
Adjustable Bench Light Types
| Type | Best use | Advantages | Limitations |
|---|---|---|---|
| Weighted-base task lamp | Permanent bench station | Easy to reposition; no edge clamp required | Uses bench space; can tip if the arm is extended |
| Clamp-on LED lamp | Small or crowded benches | Leaves the work surface clear; inexpensive | Needs a strong edge; can shift under arm movement |
| Swing-arm fluorescent lamp | Large-area illumination | Broad, soft light and long coverage | Bulbs run warmer; tubes are less efficient and less rugged |
| Gooseneck inspection lamp | Small parts and electronics | Fine aiming; compact footprint | Limited reach and weaker mechanical support |
| Magnifying lamp | Fine electronics, watch, and model work | Combines close light with magnification | Lens narrows the working area and collects dust |
For most general-purpose repairs, start with an adjustable LED bench lamp. An LED arm lamp is cooler, uses less power, and does not contain a fragile glass tube. A weighted-base version is the safer choice if your bench has no dependable clamping edge.
Arm, Base, and Shade Design
A lamp arm should reach at least 24 inches from its mounting point for a typical 30-inch-deep bench. A 30-inch or longer reach is useful when the bench holds a vise, grinder, or large assembly. Check the arm’s movement before buying: some lamps adjust vertically but cannot swing far enough sideways to light the back of a project.
Spring-balanced arms are convenient, but exposed springs and joints collect grinding dust. A covered arm is easier to wipe clean. If you do metal grinding nearby, keep the lamp outside the spark path. Fine abrasive dust can enter switches and pivot joints, while hot sparks can damage plastic shades or the power cord.
A shade that is 6 to 10 inches wide usually spreads light well across a hand-sized repair. Narrow heads create a bright spot and darker edges. Choose a frosted diffuser or a recessed LED panel when possible. Bare LED emitters can produce multiple sharp shadows and reflect directly into your eyes from a polished part.
For a clamp-mounted light, consider an clamp-on LED workbench light if your bench edge is solid. Avoid clamping to thin sheet metal, a removable bench apron, or a surface that flexes when you tighten a vise. A slipping lamp can pull its cord across the work or knock small parts onto the floor.
Controls, Heat, and Durability
Separate brightness and color controls are useful, but not essential. A simple two-level switch is often more reliable than a touch control covered in oily fingerprints. If you regularly work with magnification, dimming helps reduce eye strain. Confirm that the lamp remembers its setting after being unplugged; some inexpensive lights return to full brightness every time.
LED housings should stay warm, not painfully hot. Heat shortens LED life and can soften a plastic gooseneck. Leave ventilation space around the head, and do not cover it with a rag while the lamp is on. A rated life of 25,000 to 50,000 hours is common, but the driver and switch may fail first.
Inspect the cord length and plug location before installation. A 6-foot cord works for many benches, while an 8-foot cord is better when the outlet is mounted below the top. Route the cable along the rear edge using clips, leaving enough slack for the arm to move. Never run it across the area where a drill press, router, or grinder can catch it.
When Magnification Helps
A magnifying workbench lamp makes sense for soldering, small connectors, model work, and watch or instrument repairs. A 3- to 5-diopter lens gives useful enlargement without making the viewing area too narrow. Higher magnification reduces the working distance and becomes harder to use with a screwdriver or pliers.
Magnifying lamps are not automatically better for mechanical repairs. The lens can block your view when you approach from the side, and dust or fingerprints quickly reduce contrast. For general tool repair, a bright standard lamp plus a separate handheld inspection light is often more flexible. A rechargeable rechargeable LED inspection light is particularly useful inside cabinets, engine bays, and the underside of a bench.
Safe Placement and Daily Use
Position the light slightly above eye level and to the opposite side of your dominant hand. For a right-handed worker, placing it to the left reduces shadows from the hand and tool. Aim across the part rather than directly into it; low-angle light reveals scratches and raised burrs that overhead light can hide.
Keep the lamp at least several inches from solvents, aerosol cans, and piles of sanding dust. Do not use a household lamp in a wet area unless its electrical rating supports that environment. Before each session, check for cracked insulation, a loose clamp, or an arm joint that no longer holds position. Replacing a cheap lamp is preferable to allowing a hot or electrically damaged one to remain above the bench.
The cheaper option is fine when the lamp is used for occasional assembly, labeling, or light hand-tool work. Spend more on a better arm, diffuser, and color quality when you repair equipment for hours at a time, inspect finish defects, or need the light to remain steady while both hands are occupied.