What's inside
As an Amazon Associate I earn from qualifying purchases. This post may contain affiliate links at no extra cost to you.
The best sit-stand workbench is not a motorized desk with a vise bolted on. It is a stable woodworking bench with a height range that matches the jobs you actually do. Plan for two useful positions: a lower setting for hand-planing, chiseling, and layout, and a higher setting for sanding, assembly, and detail work. A bench that moves between those positions without wobbling is more valuable than one with a huge adjustment range.
As an Amazon Associate we earn from qualifying purchases at no extra cost to you.
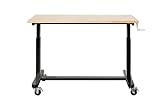
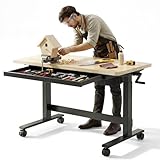


Choose the Right Height Range
Start with your elbow, not a catalog number. Stand naturally and measure from the floor to your relaxed elbow. A general-purpose standing work height is usually 4 to 6 inches below that measurement. For seated work, measure from the top of the seat to your elbow and subtract roughly 2 to 4 inches. Most woodworkers end up wanting a bench around 28 to 32 inches for seated work and 36 to 40 inches for standing work.
Those numbers are starting points, not rules. Hand-planing usually benefits from a lower surface because you can put your body weight over the plane. Fine carving, electronics-style detail work, and sanding often feel better several inches higher. If you share the bench, an adjustable range is especially useful, but do not sacrifice rigidity for extra travel.
Use a Fixed Work Zone and a Flexible Work Zone
Divide the bench into two areas. Keep the front 8 to 12 inches clear for clamping and hand-tool work. Put the vise near one front corner, with its jaws flush or nearly flush with the benchtop. The rest of the surface should remain open for assembly and finishing.
Use the rear or side of the bench for items that can move: a small sharpening station, benchtop sander, drill press, or sanding accessories. Avoid permanently mounting every tool. A movable tool tray or shallow drawer lets you switch from hand work to sanding without lifting heavy equipment repeatedly.
Leave at least 36 inches of clear aisle space in front of the bench. If you regularly handle sheet goods or long boards, 42 to 48 inches is more practical. Keep the bench at least 6 inches from a wall if you need to clamp around the back, or build a dedicated rear tool well and accept that access will be limited.
Compare Height-Adjustment Methods
| Adjustment method | Best use | Main advantage | Common failure |
|---|---|---|---|
| Manual pin or telescoping legs | Occasional height changes | Low cost and simple construction | Slow adjustment; holes can loosen over time |
| Crank-adjustable frame | One-person shops with frequent changes | Good control without electrical parts | Can rack under an uneven load |
| Electric lifting columns | Frequent seated-to-standing transitions | Fast, convenient adjustment | Motor, controls, and lifting capacity add cost |
| Fixed bench with two work surfaces | Budget shops and occasional seated work | Maximum rigidity for the money | Uses more floor space and requires moving tools |
A fixed bench with a separate seated-height auxiliary table is often the cheaper and better choice for a hobby shop. You give up instant adjustment, but you gain mass, simplicity, and fewer parts to fail. If you choose a powered frame, check its rated load with the benchtop, vise, tools, and workpiece included. A frame that is adequate for a bare desktop may struggle with a 150-pound hardwood top and a loaded cabinet.
Make the Bench Rigid and Safe
Woodworking creates sideways forces that office-style frames are not designed to handle. A vise can twist a light frame, and planing can make the whole bench walk across the floor. Use a thick top—about 1-1/2 to 2-1/2 inches is a useful range—and connect the legs with substantial stretchers or a rigid cabinet base.
Adjustable feet help on an uneven floor, but they do not replace bracing. Lock the casters when working, and use retractable casters if you need mobility without leaving the bench perched on wheels. For a powered bench, route the cord so it cannot catch on a foot control or moving column. Keep the lifting mechanism free of shavings; compressed air can drive dust into bearings and switches, so a vacuum and brush are safer for routine cleaning.
Do not place drawers where your knees need to go. A seated operator generally needs about 24 inches of knee width and 18 to 20 inches of clear depth. A shallow drawer stack on one side is more useful than a full-width cabinet that forces you to sit off-center.
Plan Storage Around the Work Height
Store the tools used at each height within one arm’s reach. Put layout tools, chisels, and marking knives in a shallow front drawer. Keep sanding discs, abrasives, and hearing protection in a side cabinet or wall-mounted bin. Heavy tools belong low, but not directly under your knees.
For dust-producing tools, use a short, flexible hose with a smooth interior and a quick-connect fitting. A 2-1/2-inch hose suits many benchtop tools; larger machines may need a 4-inch connection and a properly sized collector. Do not assume a shop vacuum will capture fine dust from a planer or table saw simply because an adapter fits. Restriction, leaks, and inadequate airflow are common failure points.
A shop-vac dust separator is a sensible budget upgrade for sanding and routing. It reduces filter loading and makes cleanup easier, but it does not turn a small vacuum into a high-volume dust collector.
Light the Surface, Not Your Back
Use bright, diffuse overhead lighting plus an adjustable task light aimed across the work. Side lighting makes scratches, tear-out, and uneven sanding easier to see. A color temperature around 4000K to 5000K is a practical range; glare matters more than the exact number.
Mount task lighting where it will not collide with a raised bench or long workpiece. Put outlets above or beside the bench, not underfoot. A power strip with overload protection is convenient for small tools, but high-draw machines should use the correct dedicated circuit and plug directly into an appropriate outlet.
A Practical Buying Checklist
Before buying, test the lowest and highest settings with your actual vise, mat, and stool. Check whether the top stays level while raised, whether the frame rocks when pushed diagonally, and whether the controls can be reached without leaning over a running tool. A manual or electric adjustable workbench frame can work well when its capacity and rigidity are documented.
For seated work, choose a height-adjustable shop stool with a foot ring rather than a soft office chair. For standing work, an anti-fatigue mat is worthwhile if it does not create a trip edge. Keep eye protection, hearing protection, and a dust mask or respirator accessible at the bench—not buried in a cabinet.
The best layout is the one that lets you change posture without changing your whole workflow: vise and clamping space at the front, movable tools at the rear, dust collection routed out of the way, and storage close enough to reach without twisting. Build for stiffness first, then add adjustment and convenience.