What's inside
As an Amazon Associate I earn from qualifying purchases. This post may contain affiliate links at no extra cost to you.
Where you put a reducer changes how air moves through a dust-collection system. Put it too close to the machine and the small duct carries the entire branch’s airflow, increasing resistance. Put it near the main line and a larger branch carries that same airflow for longer, which can reduce losses—but may take up space and require more fittings.
For most fixed machines, keep the branch duct as large as practical and reduce near the tool’s dust port. That is a useful starting point, not a rule for every shop. The right choice depends on the collector, the tool’s port, the length and layout of the run, and whether the branch serves one machine or several.
As an Amazon Associate we earn from qualifying purchases at no extra cost to you.


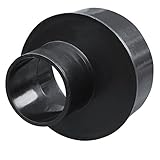
What the reducer changes
A reducer changes duct diameter, not the amount of air the collector can deliver. A smaller duct generally means higher air velocity at a given airflow, but it also increases friction and can make the system harder to pull through. Long runs, corrugated hose, tight elbows, and abrupt transitions add resistance too.
For example, a 6-inch branch reduced to a 4-inch machine port has roughly 44 percent of the cross-sectional area at the smaller end. The collector does not automatically push the same volume through both diameters: the system’s airflow settles according to the collector’s fan performance and total resistance. A small port or restrictive machine hood may limit the branch regardless of where the reducer sits.
Do not use a small hose for the full run just because the machine has a small port. If you are buying parts, compare dust-collection duct reducers and select fittings that match your actual duct sizes. Check dimensions before ordering; nominal sizes and fitting outside diameters can vary.
Reducer near the machine
With this layout, the main branch stays large until it reaches the machine. A short reducer or short length of smaller duct connects the branch to the tool port. This is usually the better arrangement when the machine has a small inlet but needs substantial airflow at its hood, such as a table saw with a separate cabinet connection or a planer with a large chip outlet.
The benefit is straightforward: less of the run is constrained by the smaller diameter. It also makes it easier to keep long branches in rigid, smooth duct rather than relying on flexible hose. Use only enough flex to allow vibration, movement, or machine access. A few feet of ribbed hose can add more resistance than a smooth metal run of the same length.
The trade-off is that a sudden step-down can create turbulence, especially if the reducer is short and abrupt. A tapered reducer is preferable when space allows. Keep the fitting accessible, and avoid placing it where chips can catch on a ledge or where it blocks a blast gate. For a simple one-machine branch, a short reducer at the tool is generally easy to install and inspect.
Reducer near the main line
Reducing at the main line means the smaller branch duct runs most or all the way to the machine. This can be reasonable for a short branch, a tool with a genuinely small dust port, or a system where a large branch would be difficult to route. It can also simplify a crowded ceiling or wall layout.
Its main drawback is resistance over the full branch length. A 4-inch branch that runs 15 feet, includes two elbows, and ends in flexible hose is a different proposition from a 4-inch connection that runs 2 feet to a small sander. If the machine needs more air than that smaller branch can deliver, moving the reducer closer to the tool is not a cure by itself—but extending the larger duct farther is often a sensible improvement.
Choose the smaller branch when its size matches the tool’s practical demand and the run is short and uncomplicated. Do not assume that a larger duct always fixes poor collection: leaks, a badly designed hood, a clogged filter, or too many open gates may be the real problem.
Quick comparison
| Layout | Best fit | Main advantage | Main drawback |
|---|---|---|---|
| Reducer near machine | Long branch; tool has a smaller port | Keeps more of the run at larger diameter | Needs space for a transition near the tool |
| Reducer near main line | Short branch; small-port tool; tight routing | Simple and compact | Small duct adds resistance along the branch |
| Large duct with long flex connection | Usually not ideal | Easy to reposition a machine | Ribbed hose and extra length can restrict airflow |
Choose duct size from the whole run
Start with the collector’s inlet and performance information, then check the machine’s port and hood. Many hobby machines have 4-inch ports; some larger planers and cabinet saws use 5- or 6-inch connections, while smaller sanders may use 2-1/2 inches. Those numbers describe connections, not guaranteed airflow requirements.
For a branch that needs a larger duct, use smooth-wall metal duct or suitable rigid plastic duct rated for dust collection, with grounded metal where appropriate to your system and local requirements. Keep bends broad, minimize tees and unnecessary reducers, and seal joints against leaks. A smooth metal dust-collection duct run is often worth the added installation effort on a permanent line. For a small, short connection, buying rigid duct may not be worthwhile.
Do not plan a multi-machine branch by adding several reducers and leaving all tools connected. Close unused blast gates so the collector pulls through the machine in use. If several machines must run at once, size the system for their combined demand rather than expecting one small branch to serve all of them.
Install and check the result
Before cutting duct, sketch the route and measure the actual fittings. Leave room to open blast gates, remove a machine’s hose, and clean out the line. Support long duct runs so joints do not sag or separate. A reducer should fit snugly, with no loose edge protruding into the airstream; secure and seal the joint according to the duct system’s instructions.
After installation, run the machine and look for dust escaping at the hood and joints. Check for chips collecting at a transition, a hose collapsing, or a blast gate that does not open fully. A simple airflow check at the machine can reveal a weak branch, but do not treat a hand-held anemometer reading as proof of safe fine-dust capture. Fine dust exposure depends on the hood, filter, airflow, and work practice together.
If collection is poor, first check for a full or clogged filter, leaks, blocked duct, and excessive flex hose. Then compare the branch layout with the machine’s port and collector capacity. A reducer near the machine is a low-cost improvement when a long run is unnecessarily small; for a short run to a modest tool, the cheaper reducer at the main line may be entirely adequate.