What's inside
As an Amazon Associate I earn from qualifying purchases. This post may contain affiliate links at no extra cost to you.
A narrow workshop cannot afford a lumber rack that steals floor space, blocks the dust collector, or turns every long board into an obstacle course. The best design keeps stock off the floor, puts the heaviest material low, and leaves a clear path around the table saw and workbench. Before buying hardware, measure the longest boards you regularly use, the wall height, and the space needed to carry a 4-by-8 sheet through the shop.
As an Amazon Associate we earn from qualifying purchases at no extra cost to you.


Choose the Right Rack Layout
For most narrow shops, a wall-mounted rack is the best starting point. It uses vertical wall space and can be placed above a workbench, assembly table, or short tool cabinet. A rack 6 to 7 feet wide with arms extending 12 to 16 inches from the wall will hold common boards without making the aisle feel cramped.
There are three practical layouts:
- Horizontal wall rack: Best for dimensional lumber, trim, dowels, and short offcuts. It is compact and easy to load.
- Vertical rack: Best for plywood, sheet goods, and long boards stored on edge. It takes less wall width but needs a stable floor or bottom cradle.
- Rolling rack: Best when the same space must serve as an assembly area or vehicle-loading path. Casters add cost and create a tipping risk unless the base is wide.
A ceiling rack can work in a very tight shop, but it is usually a poor choice for heavy boards. Loading a 12-foot board overhead is awkward, and dropped stock can damage lights, wiring, or people. Use overhead storage for lightweight molding or empty clamps, not a large pile of wet framing lumber.
Horizontal Wall Racks for Boards and Offcuts
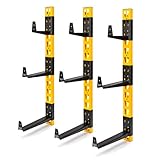
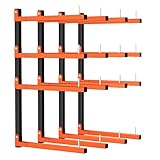
A commercial steel rack is the simplest option when you want a clean installation. Look for arms with a stated load rating, a backplate with several mounting holes, and a lip or end stop that keeps boards from sliding forward. A basic wall-mounted lumber rack is often sufficient for a hobby shop.
Do not judge capacity by the number printed on the package alone. The rating may assume the rack is attached to solid studs and that the load is spread evenly. A 100-pound rating per arm is not 100 pounds per shelf if three arms are poorly fastened to drywall.
Mount the rack to at least two studs, preferably three or more for a long installation. Use structural screws or lag screws long enough to penetrate the studs by about 2 inches after passing through the rack and any wall covering. Do not rely on drywall anchors for a lumber rack. If the stud spacing does not match the backplate, install a properly fastened plywood mounting board first.
Space the arms vertically 12 to 18 inches apart. Closer spacing improves support for flexible trim but wastes capacity and makes loading harder. Keep the lowest arm at least 30 inches above the floor if you need to sweep underneath, or place it above a bench at a height that does not interfere with tool use.
Vertical Storage for Plywood and Sheet Goods
Full plywood sheets are heavy and difficult to lift from a horizontal stack. A vertical bin near the entrance is easier to use, especially if you buy one sheet at a time. Make the bin 8 to 12 inches deep for a small shop, with dividers every 12 to 16 inches. A deeper bin encourages sheets to lean and makes the back sheets nearly impossible to remove.
For a narrow shop, store sheets on edge with the bottom supported continuously or at several closely spaced points. The base should be slightly raised from the floor to prevent moisture damage. Add a top restraint, such as a horizontal cleat or strap, so sheets cannot tip into the aisle.
Long solid lumber can also stand vertically, but only if the ceiling is high enough and the material cannot fall outward. A floor cradle made from 2-by-4s, with a wall strap at shoulder height, is safer than simply leaning boards against a wall. Keep vertical stock away from doors, electrical panels, and the arc of a swinging garage door.
Compare Lumber Rack Designs
| Design | Best use | Typical footprint | Main weakness |
|---|---|---|---|
| Wall-mounted arms | Boards, trim, and offcuts | 12–16 inches deep | Requires solid stud fastening |
| Vertical sheet bin | Plywood and sheet goods | 8–12 inches wide per bay | Heavy sheets are still awkward to move |
| Rolling rack | Shared shop space and long stock | 18–24 inches deep | Can tip or roll during loading |
| Ceiling rack | Light, infrequently used stock | Depends on ceiling clearance | Unsafe and inconvenient for heavy lumber |
When a DIY Rack Makes Sense
A DIY rack is a good value when you already have plywood and straight 2-by-4s. A simple design uses a plywood backer screwed to studs, with triangular plywood brackets below each arm. Add a front lip 1 to 2 inches high to prevent boards from rolling off. Round over or sand every exposed edge; sharp plywood corners are especially good at catching sleeves and skin.
Use construction lumber only after checking it for twist and excessive moisture. A bowed arm can push the load outward, while a twisted backer may not sit flat against the wall. For heavy hardwood, steel arms or laminated wood arms are safer than a single narrow strip of softwood.
Keep the load centered over the bracket. A long board hanging far beyond the end of a rack creates leverage that can pull fasteners out even when the total weight seems reasonable. As a conservative rule, keep unsupported overhang to no more than twice the distance between supports, and use more brackets for flexible or unusually long stock.
Buying and Installation Details That Matter
If you want adjustable levels, choose a heavy-duty adjustable lumber rack with locking pins or bolts. Adjustable arms are useful when storing both sheet trim and thick boards, but they have more parts to loosen. Inspect the fasteners every few months, particularly in a shop with vibration from a planer or dust collector.
For plywood, a vertical sheet goods storage rack is worth considering if you regularly handle full sheets. If you only buy plywood occasionally, a plywood-and-2-by-4 bin is cheaper and works just as well. Spend the savings on a proper strap or top restraint rather than decorative hardware.
Leave at least 30 inches of clear walking space in front of the rack; 36 inches is better where boards must be removed. Do not place lumber over a dust collector, heater, or electrical panel. Lumber dust can collect on motors and filters, and a fallen board can damage ducting or switchgear.
Loading Safety and Shop Flow
Sort stock by length and weight before loading. Put heavy hardwood and thick framing lumber on the lowest arms, lighter trim higher up, and short offcuts in a separate bin. A rack overloaded with small pieces is difficult to inspect and often hides a board projecting into the aisle.
After installation, load the rack gradually and watch for movement. The warning signs are a backplate pulling away from the wall, screws lifting, arms sagging, or the front edge becoming lower than the wall side. Unload it immediately if any of these appear. Mark the maximum safe loading line on the wall so a future pile does not quietly exceed the design.
Finally, keep a scrap bin separate from usable lumber. A narrow shop becomes unsafe when the rack is treated as general storage for clamps, hoses, and offcuts. Good lumber storage is not just a stronger shelf; it is a defined place that keeps stock accessible without putting it in the path of people, tools, or dust-collection equipment.