What's inside
As an Amazon Associate I earn from qualifying purchases. This post may contain affiliate links at no extra cost to you.
A good drawer insert turns a hardware drawer from a mixed pile into a usable parts system. The best setup keeps screw sizes visible, stops small washers from migrating between compartments, and lets you remove one bin without disturbing the rest. It also needs to survive sawdust, oily fingers, and the occasional drawer slammed shut.
As an Amazon Associate we earn from qualifying purchases at no extra cost to you.



What to Look For in a Workshop Drawer Insert
Start with the drawer, not the organizer. Measure the inside width, depth, and usable height with the drawer fully open. Subtract at least 3 mm from the width and depth so the insert does not bind. If the drawer is mounted on full-extension slides, check the manufacturer’s load rating before filling it with steel hardware. A shallow drawer packed with screws can weigh more than expected.
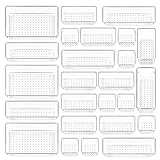
For most workshops, removable plastic bins are more useful than a single molded tray. You can carry a bin to the workbench, pour a few parts into your hand, and return it without lifting the whole drawer. Look for bins with straight, nearly vertical sides. Sloped sides waste drawer space and make it harder to use dividers or labels.
Transparent polypropylene or ABS is generally the best material. It lets you identify contents without opening every compartment and tolerates common shop oils. Brittle clear plastic can crack when a drawer is closed hard in a cold garage. Thin, flexible bins may bow under the weight of nails and washers, allowing small parts to slip underneath.
Main Insert Types Compared
| Insert type | Best use | Advantages | Limitations |
|---|---|---|---|
| Removable compartment bins | Mixed screws, nails, and washers | Portable, flexible, easy to label | Can shift if not fitted tightly |
| Modular small-parts trays | Many fastener sizes in one drawer | Efficient use of space, adjustable layouts | Dividers may be loose or difficult to remove |
| Fixed molded organizers | Dedicated drawers with stable contents | Does not rattle or move | Less adaptable when your hardware changes |
| Open-front parts bins | Frequently used screws and nails | Fast access and good visibility | Poor choice for dusty or mobile storage |
Modular small-parts organizer bins are the safest general-purpose choice when you are still developing your storage system. They cost more than a single tray, but replacing one damaged bin is cheaper than replacing an entire organizer.
Choose Compartments by Hardware Type
Do not give every fastener the same size compartment. A compartment for 2-inch deck screws can hold a large quantity, while a compartment for small machine screws or finish nails should be smaller so the contents do not spread into a deep, hard-to-search layer.
For common workshop hardware, compartments around 40 to 60 mm wide work well for wood screws, drywall screws, and general-purpose bolts. Use narrower compartments—roughly 25 to 40 mm—for nails and small machine screws. Washers deserve shallow compartments with a broad opening. A deep cup filled with flat washers is difficult to empty one at a time and encourages you to dump the whole contents onto the bench.
Keep similar parts separate by diameter and length. “Wood screws” is not a useful label if it includes 1-inch, 1-1/4-inch, and 2-inch screws together. At minimum, separate by type, diameter, and approximate length. For high-use sizes, reserve a full compartment rather than mixing them with occasional sizes.
Use plastic drawer organizer bins with dividers if you want to change the layout later. Adjustable dividers are convenient, but they must fit tightly. If you can lift a divider with one finger, it may pop out when the drawer is shaken.
Labels and Drawer Layout
Place the most-used hardware at the front or at waist height. Keep heavy bins low, especially in tall rolling cabinets. A drawer filled with steel washers can become surprisingly heavy; distributing heavy parts across several drawers reduces slide wear and makes the cabinet less top-heavy.
Label both the drawer and each removable bin. A drawer label such as “wood screws” is useful, but a bin label such as “#8 x 1-1/4 in. exterior” prevents a second search. Use labels that resist oil and dust. Printed adhesive labels covered with clear tape work well in a low-cost setup. Handwritten masking tape is fine for temporary sorting, but its edges collect grime and eventually peel.
Leave a small amount of headroom. A compartment filled to the top can spill when the bin is lifted. Keep contents about 10 mm below the rim, particularly for nails and small washers. If the drawer is mobile, use bins with lids or retainers. Open bins are cheaper and faster for a stationary cabinet, but their contents can jump compartments when the cabinet crosses a threshold.
When a Cheap Tray Is Enough
A low-cost molded tray is perfectly adequate for a single category of hardware that you use often. If one drawer holds only common #8 wood screws, a fixed tray with six to ten compartments may be simpler than a modular system. It is also less likely to rattle.
The cheaper option becomes frustrating when your inventory changes. Fixed compartments cannot be resized, and a tray that fits one drawer may be useless after you replace the cabinet. Avoid buying a large assortment of tiny bins before measuring: unused compartments consume space, and small bins are easy to overfill.
Hardware drawer organizer cabinet bins make sense for a permanent screw cabinet or parts chest. Choose them when you want every location fixed and visible. For a general workbench drawer, removable bins are usually more versatile.
Dust, Rust, and Maintenance
Drawer inserts do not keep hardware clean by themselves. Fine sawdust settles into open compartments and can make threads gritty. In a woodworking shop, place frequently used fasteners in lidded bins or a drawer with a reasonably tight front. Do not store damp nails or washers in sealed containers; trapped moisture can accelerate rust. Dry the hardware first and add a small desiccant pack only where it will not contact loose parts or create dust.
Vacuum the drawer rather than blowing it out with compressed air. Blowing dust moves it into slides, neighboring drawers, and your lungs. Once or twice a year, remove the bins, wipe the drawer, and check that the slides are still secure. Replace cracked bins immediately. A broken corner can release hundreds of small screws into the drawer below.
A Practical Buying Plan
For a first setup, buy enough removable bins for one drawer and sort only the fasteners you use weekly. Add bins as your categories become clear. A useful starting arrangement is one drawer for wood screws, one for machine screws and nuts, one for nails, and one shallow drawer for washers and small miscellaneous hardware.
If you regularly carry parts to the bench, prioritize bins with finger grips and straight sides. If the cabinet never moves, open-front or fixed trays save money and provide faster access. The right insert is the one that keeps each part identifiable, stays put when the drawer moves, and leaves enough room to add the next size you actually buy.