What's inside
As an Amazon Associate I earn from qualifying purchases. This post may contain affiliate links at no extra cost to you.
A busy bench does not usually run out of tools first. It runs out of places for the small things: M3 screws, wire connectors, O-rings, router bits, fuses, washers, springs, and bits of hardware saved for “later.” Once those parts collect in coffee cans or shallow trays, setup time expands and mistakes become more likely.
Small-parts drawer cabinets solve that problem, but the wrong cabinet creates a new one. Drawers that are too shallow waste space, deep drawers turn into mixed bins, and lightweight plastic units slide across the bench when you pull one open. The best choice depends on the parts you keep, how often you access them, and whether the cabinet will live on the bench, under it, or on a wall.
As an Amazon Associate we earn from qualifying purchases at no extra cost to you.


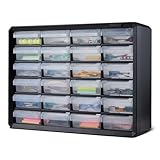
Choose the right drawer size
Start by measuring the largest parts you actually need to store, not the smallest. For general workshop hardware, drawers about 1 inch high are useful for screws, nuts, washers, fuses, and electrical terminals. Drawers around 2 inches high handle hose clamps, small bearings, cable glands, and irregular fittings. Anything deeper than about 3 inches tends to become a parts bin unless you use dividers.
Drawer depth matters as much as height. A 4-inch-deep drawer is adequate for most bench hardware, while 6-inch-deep drawers hold more but consume valuable reach space. A drawer that extends 8 inches or more can be useful in a cabinet, but may collide with tools, a benchtop vise, or your body when opened.
Measure the available footprint before buying. A cabinet 20 inches wide and 8 inches deep may hold hundreds of parts, but it can crowd a narrow 24-inch-deep bench. Leave enough room to open the drawers fully without hitting a grinder, drill press column, or dust-collection hose.
Compare the main storage styles
| Storage type | Best use | Strengths | Common drawbacks |
|---|---|---|---|
| Plastic drawer cabinet | Light hardware and consumables | Low cost, easy to see contents, no rust | Drawers flex, labels peel, cabinet can slide |
| Steel drawer cabinet | Frequent use and heavier parts | Rigid, durable, better drawer retention | Higher price, more noise, possible corrosion |
| Modular bins on a rail | Parts used at a standing bench | Easy to remove and carry to the job | Less protected from dust and spills |
| Divided organizer case | Portable project hardware | Contents travel with the project | Small compartments can mix when tipped |
For a fixed bench, a small-parts storage cabinet with drawers is the practical starting point. Cheap plastic is fine for wood screws, electrical connectors, and light-duty consumables. Pay more for steel when drawers will be opened dozens of times per day, when you store bearings or metal fittings, or when the cabinet may be bumped by stock and tools.
Look for useful drawer features
Full stops are important. A drawer that pulls completely out when you lift a heavy handful of washers is a nuisance at best and a floor-spreading disaster at worst. Look for a molded stop, friction catch, or metal retainer. If the cabinet will be wall-mounted, the retention system matters even more because an open drawer shifts the center of gravity forward.
Clear drawers make inventory quick, but they are not automatically better. Clear plastic becomes cloudy from shop dust, and dark parts disappear against a dark cabinet interior. Opaque drawers with large front labels are often easier to use after several years. Choose labels at least 1 inch high and leave room for a second line, such as “M4 x 12 — socket head” rather than simply “M4.”
Removable dividers are useful only if they stay put. Loose dividers can lift when you shake out parts, allowing screws and washers to cross-contaminate. For tiny hardware, fixed compartments or small removable cups inside a drawer are safer. A drawer with six narrow compartments is usually more efficient than one large drawer full of mixed hardware.
Check the drawer opening, not just the outside dimensions. Some cabinets advertise a 4-inch drawer but provide only 3 inches of usable width after rails and sidewalls. Also check the weight rating if it is listed. A shallow plastic drawer may hold 1 to 2 pounds comfortably, while a steel drawer with a positive stop can handle several pounds without bowing.
Choose bench, wall, or under-bench placement
Bench-top cabinets are fastest to access, but they consume work surface and collect dust. Keep them at the rear edge of the bench, away from sanding and sawing, and avoid placing them beside a vise where chips and offcuts are constantly thrown. A raised cabinet also needs a non-slip base. Rubber shelf liner works for light units; heavier cabinets should be screwed to the bench or backed against a fixed stop.
Wall-mounted storage saves bench space and gives a standing user a clear view of the labels. Mount the cabinet so the lowest drawer is roughly 36 to 48 inches above the floor. Use the manufacturer’s mounting holes and fasteners suited to the wall: screws into studs are preferable, while drywall anchors must be rated for the fully loaded cabinet, not its empty weight. Never rely on adhesive strips for a loaded drawer cabinet.
Under-bench cabinets keep the top clear, but low drawers are easy to ignore and awkward to read. They work well for less frequently used hardware, replacement parts, and bulk stock. Leave at least 2 inches of clearance around the cabinet if nearby tools create vibration or if you need to remove the unit for cleaning.
Control dust and mix-ups
Small-parts drawers are not sealed storage. Fine sanding dust enters through gaps around the drawer fronts, then settles on threads and electrical contacts. Keep the cabinet out of the direct airflow from a random-orbit sander, and connect the tool to a workshop dust collection separator before dust reaches the shop vacuum. A separator will not make the drawers airtight, but it reduces the dust that becomes airborne around the bench.
Store rust-prone parts in small resealable bags or lidded cups inside the drawers. Add a desiccant packet to drawers used for steel fasteners in a damp shop, but replace it when saturated. Do not store oily parts loose beside clean electrical terminals; residue transfers quickly and makes labels unreadable.
Organize for faster work
Group hardware by type first, then size. Put metric and imperial fasteners in separate cabinets or clearly different drawer rows. Keep commonly used sizes between waist and eye level, and reserve the bottom rows for bulk stock. A simple numbering system—such as A1 through A24—makes restocking easier than relying on memory.
Do not fill every drawer on day one. Leave roughly 15 percent spare capacity for new sizes and project-specific parts. When a drawer becomes more than three-quarters full, split it or move slow-moving stock elsewhere. The cheaper cabinet is perfectly adequate when it holds light parts, stays dry, and is not overloaded. Spending more is justified mainly for rigid construction, reliable stops, secure mounting, and drawers that will survive constant daily use.
Use portable organizers where needed
If you carry fasteners between the bench and a job site, add a portable small-parts organizer case instead of removing drawers from the main cabinet. Choose a case with a gasketed lid or positive latches if it will travel in a vehicle. For a stationary workshop, though, fixed drawers are faster: you can see the labels, return parts with one hand, and avoid carrying an entire assortment just to use three screws.