
What's inside
As an Amazon Associate I earn from qualifying purchases. This post may contain affiliate links at no extra cost to you.
The best table saw push block for most woodworkers is a wide-platform block with a high-friction sole and an elevated handle that keeps your hand 3+ inches above the blade, but the right choice depends on whether you prioritize maximum control on narrow rips, hand clearance for blade guards, or simple grip for general crosscuts.
As an Amazon Associate we earn from qualifying purchases at no extra cost to you.

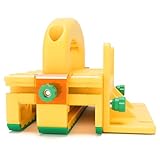


How Grip, Clearance, and Control Actually Differ
A table saw push block is not just a handle on a block of plastic. The three design factors that change safety and cut quality are how the sole grips the workpiece, how high and far back the handle keeps your hand from the blade, and how well the block controls narrow stock without tipping or drifting.
Grip: Friction vs. Mechanical Hold
Friction-sole blocks use a soft, high-tack material like thermoplastic rubber or neoprene to grab the wood. They work on flat, planed stock without needing a heel or lip, which helps when you need pressure directly over the cut. Heel-style blocks use a rear lip that hooks the end of the board. They push harder on heavy or rough-sawn lumber but give you less downward pressure near the blade, so the workpiece can lift or chatter if your hand is too far back.
Magnetic or adjustable-sole designs like the MICROJIG GRR-RIPPER add side legs that straddle the blade and apply pressure on both sides of the kerf. That mechanical control prevents the offcut from kicking or twisting, which is the main failure mode of flat blocks on rips under 2 inches wide.
Hand Clearance: Height and Offset
Hand clearance is the vertical distance from the sole to the top of the handle, plus the horizontal offset from the front edge. A short, low handle puts your knuckles within an inch of the guard and forces you to reach over the blade on through-cuts. An elevated, offset handle centered over the sole keeps your hand 3 to 4.5 inches above the table and behind the leading edge, which leaves room for a dust shroud or blade guard to pass underneath without interference.
If your saw has a bulky overhead guard or you use a riving knife-mounted guard, look for a block with at least 3.5 inches of clearance and a handle that is recessed from the front. Low-profile blocks will collide with the guard before the cut is finished.
Control on Narrow Stock
Control comes from base width, sole length, and whether pressure is applied to both sides of the blade. A narrow 2-inch wide block will tip into the gap between the blade and fence on rips under 1-1/2 inches. A wide platform of 4+ inches bridges that gap and resists tipping. Straddling push blocks with two or three legs provide the most control on stock from 1/4 inch to 1-3/4 inches because they contact the keeper piece and the offcut simultaneously, preventing the offcut from binding against the blade.
Push Block Types Compared By Specs
These are the most common categories you will find in 2026. Dimensions and materials are based on current manufacturer specifications for established models.
| Type / Example Model | Sole Size (L x W) | Handle Height Above Sole | Weight | Sole Material | Best For |
|---|---|---|---|---|---|
| Standard Friction Block (POWERTEC 71009 style) | 5.5 x 3.0 in | 2.75 in | 6.2 oz | Foam + rubber pad | General crosscuts, sheet goods |
| Ergonomic Angled Block (Bench Dog PushBLOX style) | 6.0 x 3.25 in | 3.25 in | 8.5 oz | High-friction thermoplastic rubber | Frequent ripping, angled grip comfort |
| Straddling / 3D Pushblock (MICROJIG GRR-RIPPER GR-100 / GR-200) | 9.5 x 3.75 in (with legs) | 4.25 in | 14.0 oz | Non-slip green grooved rubber | Narrow rips 1/4 in to 2 in, thin strips |
| Grabber-Style Dual Handle (Milescraft GrabberPro) | 8.5 x 4.1 in | 4.0 in | 12.8 oz | Diamond-grip rubber + heel hook | Wide boards, router table crossover use |
| Shop-Made / Wood Heel Stick | Custom, typically 12 x 3 in | 1.5 – 2.0 in | 4.0 – 7.0 oz | Bare wood + sandpaper | Zero-cost, disposable, sacrificial cuts |
The straddling design is the only type that maintains continuous control when the fence is set under 1 inch from the blade. Single-block designs lose contact with the keeper piece at that width and rely entirely on the fence to guide the offcut, which increases burn marks and kickback risk.
Decision Matrix: Match the Block to Your Work
| Your Situation | Priority | Recommended Design | Why |
|---|---|---|---|
| Ripping thin strips, flooring, or drawer sides under 2 in wide weekly | Control + kickback prevention | Straddling 3D pushblock | Two-sided pressure keeps offcut from twisting; adjustable legs fit different kerfs |
| General furniture work with 3 in+ wide boards and sheet goods | Comfort + versatility | Ergonomic angled friction block or Grabber-style | Wide sole prevents tipping, tall handle clears guard |
| Small shop, limited storage, one block for table saw + jointer + router table | Versatility per dollar | Grabber-style dual-handle | Interchangeable handles and wider base work across machines |
| Beginner on a tight budget, occasional cuts | Cost + simplicity | Standard friction block + shop-made heel stick | Low general market range $10-$20 each; heel stick is sacrificial for final inches |
| Saw with tall overhead guard or SawStop-style dust collection guard | Hand clearance | Any block with 4.0 in+ handle height | Prevents handle-guard collision that stops the cut short |
What a Listing Won’t Tell You: Ownership and Wear
Push blocks are consumables, even the expensive ones. Knowing what fails first saves you from using a slick block that no longer grips.
- Sole wear is the failure point. Rubber pads harden with age, UV exposure, and sawdust impregnation. Once the pad is glazed or compressed smooth, friction drops by more than half. Clean the sole after each session with a stiff nylon brush and occasional denatured alcohol wipe. Replace pads when you can slide the block on planed maple with light hand pressure.
- Heel lips chip. Plastic heels on budget blocks crack if they contact the blade. Heavy-duty blocks use replaceable heels or allow you to cut into a sacrificial leg intentionally. If your block is not designed to be cut, never let it pass over the blade.
- Ergonomics matter for long sessions. A handle with a 10 to 15-degree forward angle reduces wrist extension compared to a vertical knob. For users with smaller hands, a narrower handle diameter under 1.25 inches improves grip without fatigue. Foam-wrapped handles absorb vibration better than hard ABS.
- Common mistake: using one block for narrow rips. A single flat block cannot apply pressure to the offcut side of the kerf. On stock narrower than the block itself, the block overhangs the blade path. This is when you need either two blocks, a straddling block, or a featherboard plus push stick combo. Never trap the offcut between the blade and fence without control on top of it.
- Storage affects grip life. Do not leave rubber-soled blocks on a sunny windowsill or near a heater. Heat accelerates hardening. Hang them or store sole-up so the pad does not take a permanent compression set.
Cost Per Use Calculation
A push block’s true cost is not the purchase price but the cost per use over its pad life. For a general market example:
A standard friction block in the $12 to $18 range typically lasts 150 to 250 rips before the pad glazes, which equals $0.06 to $0.12 per use. A straddling 3D pushblock in the $45 to $75 range includes replaceable legs and grippers; the main body lasts years, while replacement grip strips cost in the $8 to $15 range for a set and last 200 to 400 uses, bringing long-term cost to $0.04 to $0.08 per use after the initial purchase. If you rip narrow stock more than twice a month, the higher upfront cost pays back in both consumable life and reduced waste from burn-free cuts.
Setup for Narrow Stock: A Safer Sequence
1. Set the fence and check clearance
With the saw off, place the push block on the keeper side of the blade and slide it through the cut path. Verify the handle and any legs clear the guard and riving knife without lifting.
2. Position pressure over the keeper
For flat blocks, center your downward pressure just in front of the blade over the keeper piece, not over the offcut and not at the very tail. For straddling blocks, adjust the center leg to sit in the kerf and the outer legs to press the keeper and offcut evenly. Tighten all knobs before starting the motor.
3. Maintain continuous forward motion
Feed at a steady rate without stopping mid-cut. Stopping leaves burn marks and lets the blade grab. Use a second block or heel stick in your other hand to keep the offcut moving past the blade if you are not using a straddling design. Keep both blocks moving until the workpiece is past the blade and riving knife.
4. Park the block, not your hand
After the cut, push the stock well past the blade before lifting. Never reach over or behind the blade to grab the offcut while the blade is coasting.
FAQ
Do I need a push block or a push stick?
Use a push block when you need downward pressure to keep flat stock from lifting, which is most rips and almost all narrow stock work. Use a push stick when you need to push a narrow tail end through but cannot fit a wide block between the blade and fence, or for jointing thin edges. Many woodworkers keep both.
Can I make my own push block?
Yes, a shop-made block from 3/4 inch plywood with a glued-on crepe rubber sole and a screwed-on handle works well and can be sacrificial. Make the sole at least 6 inches long and 3.5 inches wide, and use a high-friction rubber, not sandpaper, which scratches the workpiece. Replace it as soon as the heel is chewed up.
Are magnetic push blocks safe?
Magnetic bases only assist on cast iron tables with steel fences and do not replace hand pressure. They help keep a block from vibrating off the table between cuts but provide no holding force during the cut itself on non-ferrous surfaces or wood. Do not rely on the magnet to resist kickback.