What's inside
As an Amazon Associate I earn from qualifying purchases. This post may contain affiliate links at no extra cost to you.
Long-handled tools are easy to underestimate. A shovel, broom, rake, hoe, or floor squeegee may weigh only a few pounds, but its handle needs 4 to 6 feet of vertical clearance and enough room to remove the tool without dragging neighboring tools down with it. Leaning them in a corner wastes floor space, damages handles, and creates a reliable trip hazard.
The best storage method depends on how many tools you own, whether the shop is heated, and how often you use each one. A wall-mounted rack is usually the best choice for a small workshop. A freestanding tower works better when wall space is occupied by cabinets, dust collection ducting, or a workbench. For a large collection, a combination of vertical slots and individual holders is easier to manage than one oversized rack.
As an Amazon Associate we earn from qualifying purchases at no extra cost to you.


Choose the Storage Style
| Storage type | Best for | Advantages | Limitations |
|---|---|---|---|
| Wall-mounted hooks or clips | 6 to 15 frequently used tools | Low cost, compact, easy to see | Requires solid wall mounting; tools can swing |
| Vertical slot rack | Many shovels, rakes, and brooms | Separates tools, fast access, good capacity | Uses wall depth and needs a floor or bottom rail |
| Freestanding tower | Renters or shops with limited wall space | Portable and does not require wall mounting | Consumes floor area and can tip if overloaded |
| PVC or plywood DIY rack | Budget storage and custom layouts | Cheap, repairable, easy to resize | Needs careful fastening and edge finishing |
For most workshops, a vertical slot rack is the most useful compromise. It keeps handles separated, prevents the common “broom avalanche,” and lets you group tools by job. A rack with six to eight slots is enough for a compact shop. If you have more than 12 tools, leave at least one empty slot. A full rack is difficult to use because every removal disturbs the tools beside it.
Wall-Mounted Racks: The Best Default
Wall racks make good use of otherwise wasted wall height. Install the main support between 36 and 48 inches above the floor, depending on tool length and your height. A second guide near the floor or 12 to 18 inches above it stops handles from swinging sideways. Without that lower guide, a rake or shovel can rotate into a walkway.
Look for wall-mounted long-handled tool racks with a stated load rating and hardware suited to your wall. Hooks that rely on friction alone are acceptable for a broom or lightweight duster, but heavier shovels need a shaped cradle, retaining loop, or positive hook. A 2-inch-deep hook is usually more secure than a shallow peg.
Fasten the rack to studs whenever possible. If that is not practical, use appropriate anchors for the wall material and keep the total load conservative. Drywall anchors are not a substitute for a stud when the rack may carry 30 or 40 pounds of tools. On concrete or masonry, use masonry screws or expansion anchors rather than general-purpose wood screws.
Why Slot Racks Beat a Heap of Hooks
Individual hooks are flexible, but they allow tools to overlap. Slot racks hold each handle in its own position, making it clear where the tool belongs. This matters in a busy workshop: returning a rake to an open slot takes seconds, while sorting a cluster of handles takes longer and often does not happen.
Choose slots at least 2 inches wide for ordinary wooden or fiberglass handles. Allow 3 inches for tools with thick grips, D-handles, or attached guards. Measure your actual tools before buying; handle diameters vary more than product photos suggest. The rack should also have enough depth to support the tool without forcing the handle against the wall.
Cheap plastic racks are fine for light brooms, dustpans, and extension poles. They are less convincing for steel shovels or tools with wet, dirty heads. The failure mode is usually not immediate breakage. Clips loosen, brittle plastic cracks in cold weather, or the rack pulls away from the wall after repeated one-handed tool removal. For heavier collections, a steel rack or a plywood rack screwed into studs is worth the modest extra cost.
A Practical DIY Rack
A simple plywood rack can be made from a 1-by-6 backboard and a row of 2-by-4-inch openings cut into a second board. Mount the upper board to studs, then add a lower rail with matching openings or individual loops. Sand every edge that contacts a handle. Sharp plywood corners will eventually scratch fiberglass and catch clothing.
PVC pipe sections also work well for clean, dry tools. Four-inch pipe accommodates many shovel and rake handles, while 2-inch pipe suits brooms and narrow poles. Cut each section 10 to 14 inches long and screw it to a backboard with pipe straps. Do not rely on adhesive alone. PVC becomes less forgiving in cold temperatures, and a loaded section can pull free when a tool catches.
A DIY rack is especially useful when your tools have unusual shapes. Make separate wide slots for a snow shovel, post-hole digger, or floor squeegee rather than forcing everything into identical openings. Mark each slot with a label or simple outline so tools return to the same location.
When Freestanding Storage Makes Sense
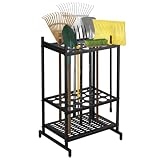
A freestanding freestanding long-handled tool organizer is useful in a rented garage or a shop with finished walls. It is also convenient when tools need to move between a workshop and a shed. The trade-off is floor space: allow roughly 18 to 24 inches of width and at least 12 inches of depth, plus clear access in front.
Stability is the deciding factor. A narrow tower loaded with tools can tip when you pull out a heavy shovel from the top row. Choose a wide base, rubber feet, and a low center of gravity. If the organizer is tall or stands near a doorway, anchor it to a wall even if the manufacturer calls it freestanding. Keep the heaviest tools in the lowest slots.
Installation and Safety Details
Keep tool heads off the floor. Wet soil, concrete moisture, and sawdust retainers can accelerate rust on steel and mildew on wooden handles. Hang shovels and hoes with the working end down only if the rack supports the head securely; otherwise, store them handle-up in individual slots. Never leave sharp edges facing a walking path.
Maintain at least 30 inches of clear walkway in front of the rack, and do not install it where a falling tool could strike a light switch, electrical panel, or dust-collection control. Store pruning tools, axes, and other sharp implements in dedicated sheaths or closed holders. For a shop used by children or visitors, use retaining straps on heavy or sharp tools.
If you use a dust collector, avoid placing an open rack directly beside the intake or filter-cleaning area. Dust-coated tool heads are harder to inspect, and loose bristles or rags can be pulled toward moving equipment. A rack on the opposite wall, or behind a shallow cabinet, stays cleaner and makes routine maintenance easier.
For a basic setup, buy the heavy-duty garage tool storage hooks you need for the tools used every day, then add a plywood or slot rack as the collection grows. There is no advantage to buying a large organizer before you know the final tool mix. The best system is the one that leaves every handle visible, supported, and easy to return.