What's inside
As an Amazon Associate I earn from qualifying purchases. This post may contain affiliate links at no extra cost to you.
A woodworking shaper throws chips and fine dust in several directions, depending on the cutter, feed direction and workpiece. A hood that works for a jointer or table saw may leave a shaper’s cutter exposed, block access to the fence, or interfere with long stock. The best setup captures dust close to the cutter without making safe feeding harder.
Before buying a hood, check the shaper’s existing port size and where its internal collection opening sits. Many setups use a 4-inch hose; larger machines may have a 5- or 6-inch outlet. A small hood connected to an undersized or poorly routed duct will not make up for weak airflow.
As an Amazon Associate we earn from qualifying purchases at no extra cost to you.
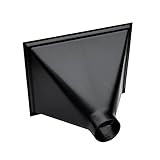
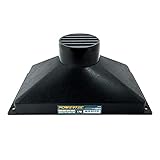

What a good shaper hood needs
A useful shaper hood encloses the cutter area while leaving room to guide stock through the cut. It should connect securely to the machine’s dust port, resist the pull of the dust collector, and allow routine cutter changes. Clear sightlines matter: if the hood hides the cutter-to-fence relationship, it can encourage poor setup or unsafe feeding.
For general-purpose work, aim for a hood opening that covers the cutter and the area where chips leave the cut, rather than sealing the workpiece tightly. A gap of roughly 1/4 to 1/2 inch around stationary edges can be practical, but openings must still accommodate the stock and cutter. Treat those dimensions as a starting point, not a universal specification; cutter diameter and workpiece shape vary.
Keep the hose short and avoid sharp bends. A 4-inch branch commonly serves one machine port, while a 6-inch main duct can carry more air with less resistance. The actual airflow depends on the collector, filters, duct layout and fittings. If chips collect under the table or escape around the fence, inspect the entire path before assuming the hood itself is the problem.
Hood designs compared
| Design | Best use | Advantages | Limitations |
|---|---|---|---|
| Factory or under-table hood | Routine work with a compatible shaper | Compact, usually connects directly to the machine port | May miss chips thrown above the table or toward the operator |
| Fence-mounted hood | Cuts where chips travel toward the fence | Captures close to the cutter and moves with fence adjustments | Can obstruct narrow stock, large cutters or visibility |
| Overarm guard with extraction | Exposed cutter work and varied setups | Places capture above the table; can improve containment | Costs more and may need careful positioning for each job |
| Shop-built auxiliary hood | Unusual profiles or a machine with poor built-in capture | Inexpensive and adaptable to the job | Needs sound construction, a secure mount and repeated adjustment |
Choose by cut and machine
Start with the factory hood if it encloses the lower cutter area and connects to a port at least as large as the machine specifies. This is often enough for enclosed work such as molding runs. A replacement shaper dust hood makes sense when the original is cracked, missing or too small, but confirm the mounting dimensions and outlet diameter before ordering. “Fits most machines” is not a substitute for measuring.
A fence-mounted hood can help when the cutter throws chips toward the back of the table. Check that it does not narrow the opening needed for your stock or force your hands closer to the cutter. The fence and guard should remain secure under hose pull; a lightweight plastic fitting dangling from a flexible hose can shift during a pass. For long boards, arrange the hose so it cannot snag the infeed or outfeed supports.
An overarm guard is useful when a cutter is exposed above the table or when chip direction changes across different operations. It is also the more expensive and space-demanding choice. Make sure its arm clears tall workpieces, the fence and any hold-downs. For a small shop that runs enclosed profiles only, a properly working factory hood may be the better purchase.
Build an auxiliary hood when needed
A simple auxiliary hood can be made from plywood, sheet plastic or a sturdy commercial enclosure, provided it is fixed to a safe, rigid point and cannot touch the cutter. Design it around the workpiece and cutter, not around the hose alone. A 4-inch port is a common practical connection, but do not reduce a larger machine outlet just to match a convenient fitting unless the manufacturer permits it.
Use smooth interior transitions where possible. Internal ledges and abrupt corners collect chips, then restrict airflow. Make the hood easy to remove for cutter changes and cleaning. Before connecting power, rotate the spindle by hand through a full turn and check clearance with the fence, guard and representative stock in place. Then test the dust system with scrap and inspect for leaks and buildup.
Flexible hose is convenient at a moving guard, but long corrugated runs add resistance. A short length of 4-inch dust-collection hose is a reasonable connection for many machine ports. Keep the hose supported, avoid crushing it, and use a grounded, purpose-made dust-collection system rather than an improvised vacuum hose that collapses or sheds material.
Airflow, maintenance and safety
Dust capture depends on more than the hood. A clogged filter, full bin, leaking duct or undersized collector can leave visible dust even with a well-shaped enclosure. Check the collector’s stated airflow at the machine—not only its advertised free-air rating—and clean filters as directed. Fine wood dust is a health hazard; a hood is not a replacement for suitable respiratory protection or general shop cleanup.
Common failure signs include chips piling beneath the table, dust escaping around the guard, a hose that collapses under suction, or a hood that vibrates out of position. Fix the cause rather than simply adding a larger opening. Larger openings can reduce capture at the cutter if the collector cannot maintain enough airflow through them.
Never remove a guard or crowd the cutter to improve extraction. Keep hands out of the cutter path, use suitable push blocks and hold-downs, and follow the shaper and cutter manufacturers’ instructions. Disconnect power before reaching into the hood to clear a blockage or change a setup. A well-chosen design should make dust collection part of the safe setup—not a reason to compromise it.